
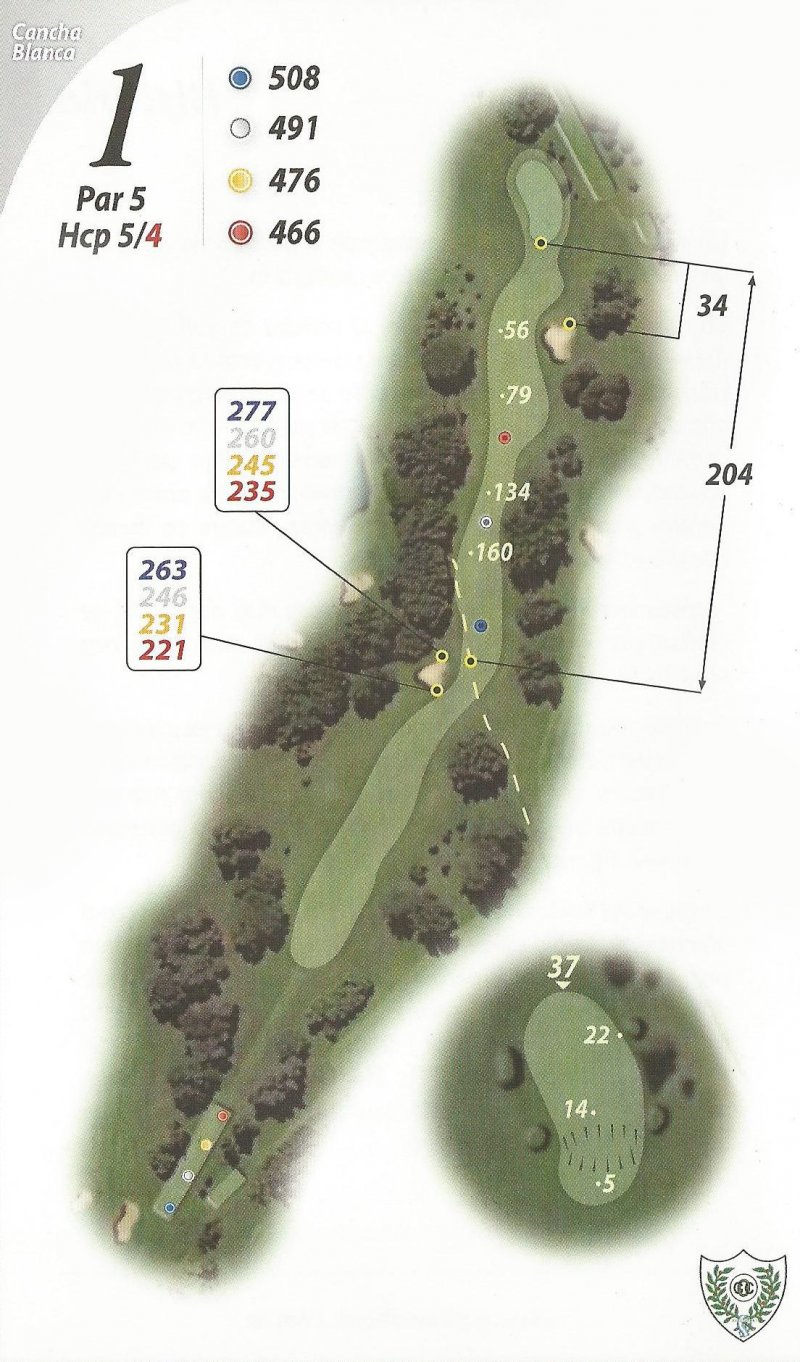
Hole 1 (White)
Par: 5 | Yards: 508
Dogleg left that turns at 300 yds. It goes downhill until the 300 yard mark and then uphill again. The green’s surface can’t be seen from the Fairway, it’s difficult calculate distance to the pin.
There’s a cross bunker on the left at 270 yards and another one on the right just 50 yards from the green. This spot provides a very nice view: the amazing unevenness of the Course can be appreciated at this point.
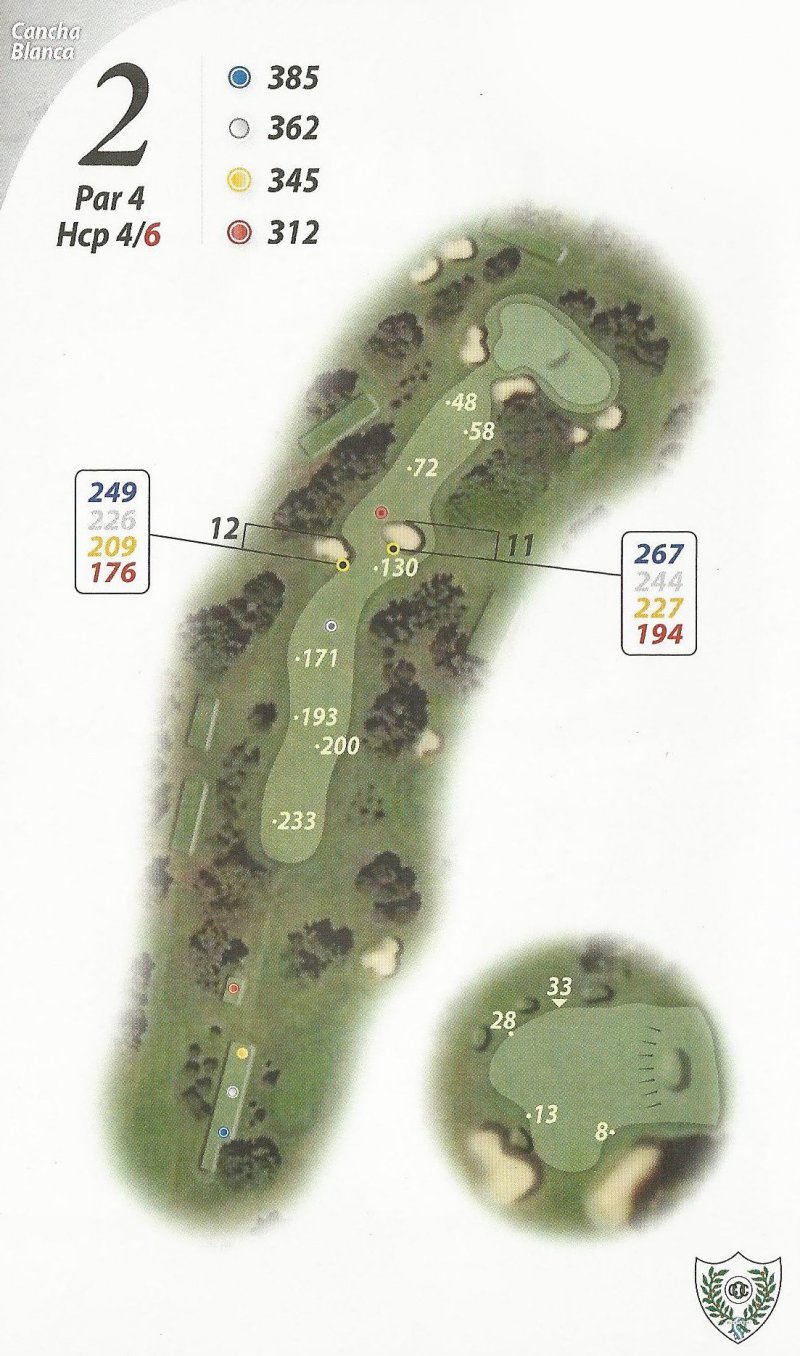
Hole 2 (white)
Par: 4 | Yards: 385
This hole was redesigned and lengthened in 1989. It’s a Dogleg right where the tee shot has to be no longer than 245 yards. Two cross bunkers constraint and protect the landing area. If you are a very long hitter, you can carry the bunkers but the shot must have fade, if not it will end inside the woods beside the 3rd tee.
The Second shot faces a wide and short green. This green is the only double green in the course, sharing the putting surface with hole 2 from the Blue Course.
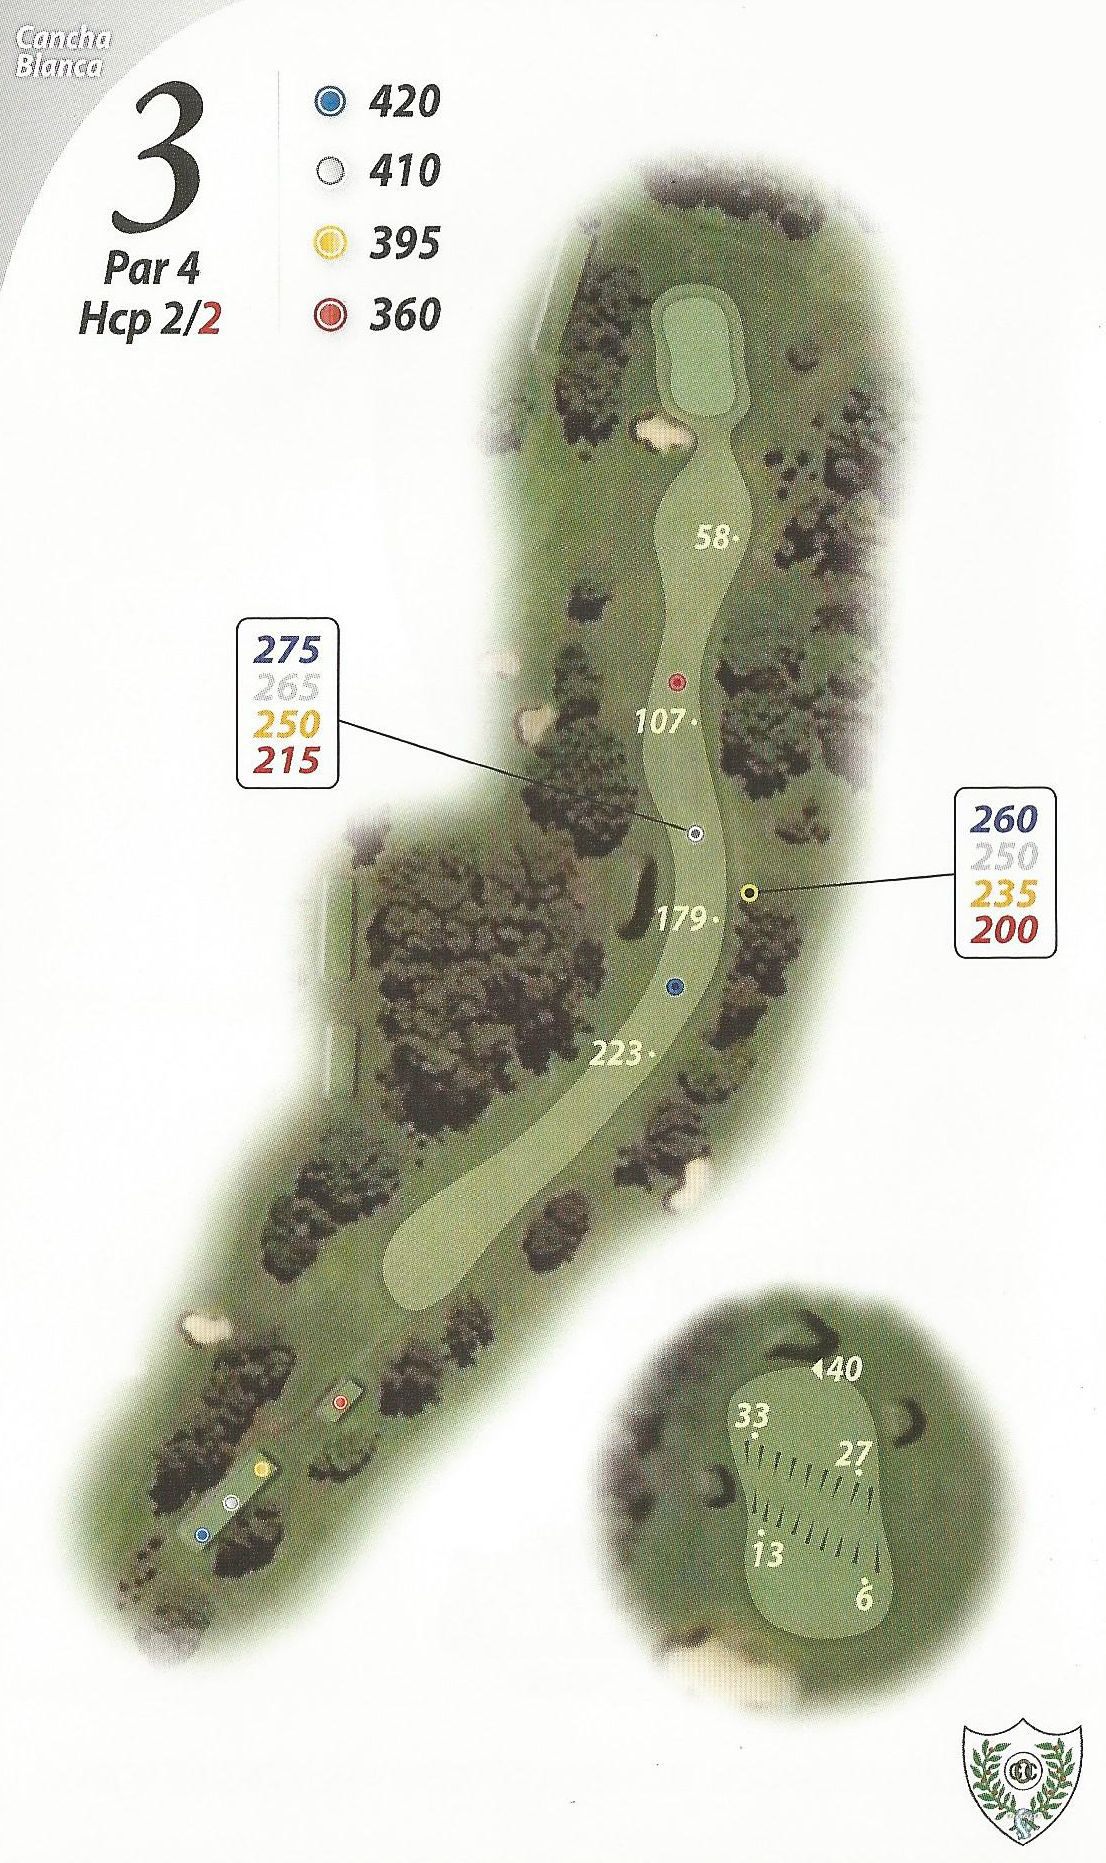
Hole 3 (white)
Par: 4 | Yards: 420
Dogleg left and one of the toughest par 4s in Argentina. It’s the Handicap 3 hole in the Central Course and also one of the nicest holes on the property.
Very narrow landing area where you need to draw your tee shot in order not to end inside the woods. There’s a small hill on the left which doesn´t allow a clean view of the fairway. Tee shot has to be really very precise, maybe the hardest one on the 27 holes. Long second shot to a very special green: it has a ditch that crosses it diagonally, which makes it really hard to play the putt if you miss the surface where the pin is. Some stand with their backs to the hole, so as to aim the slope and catch the downfall!
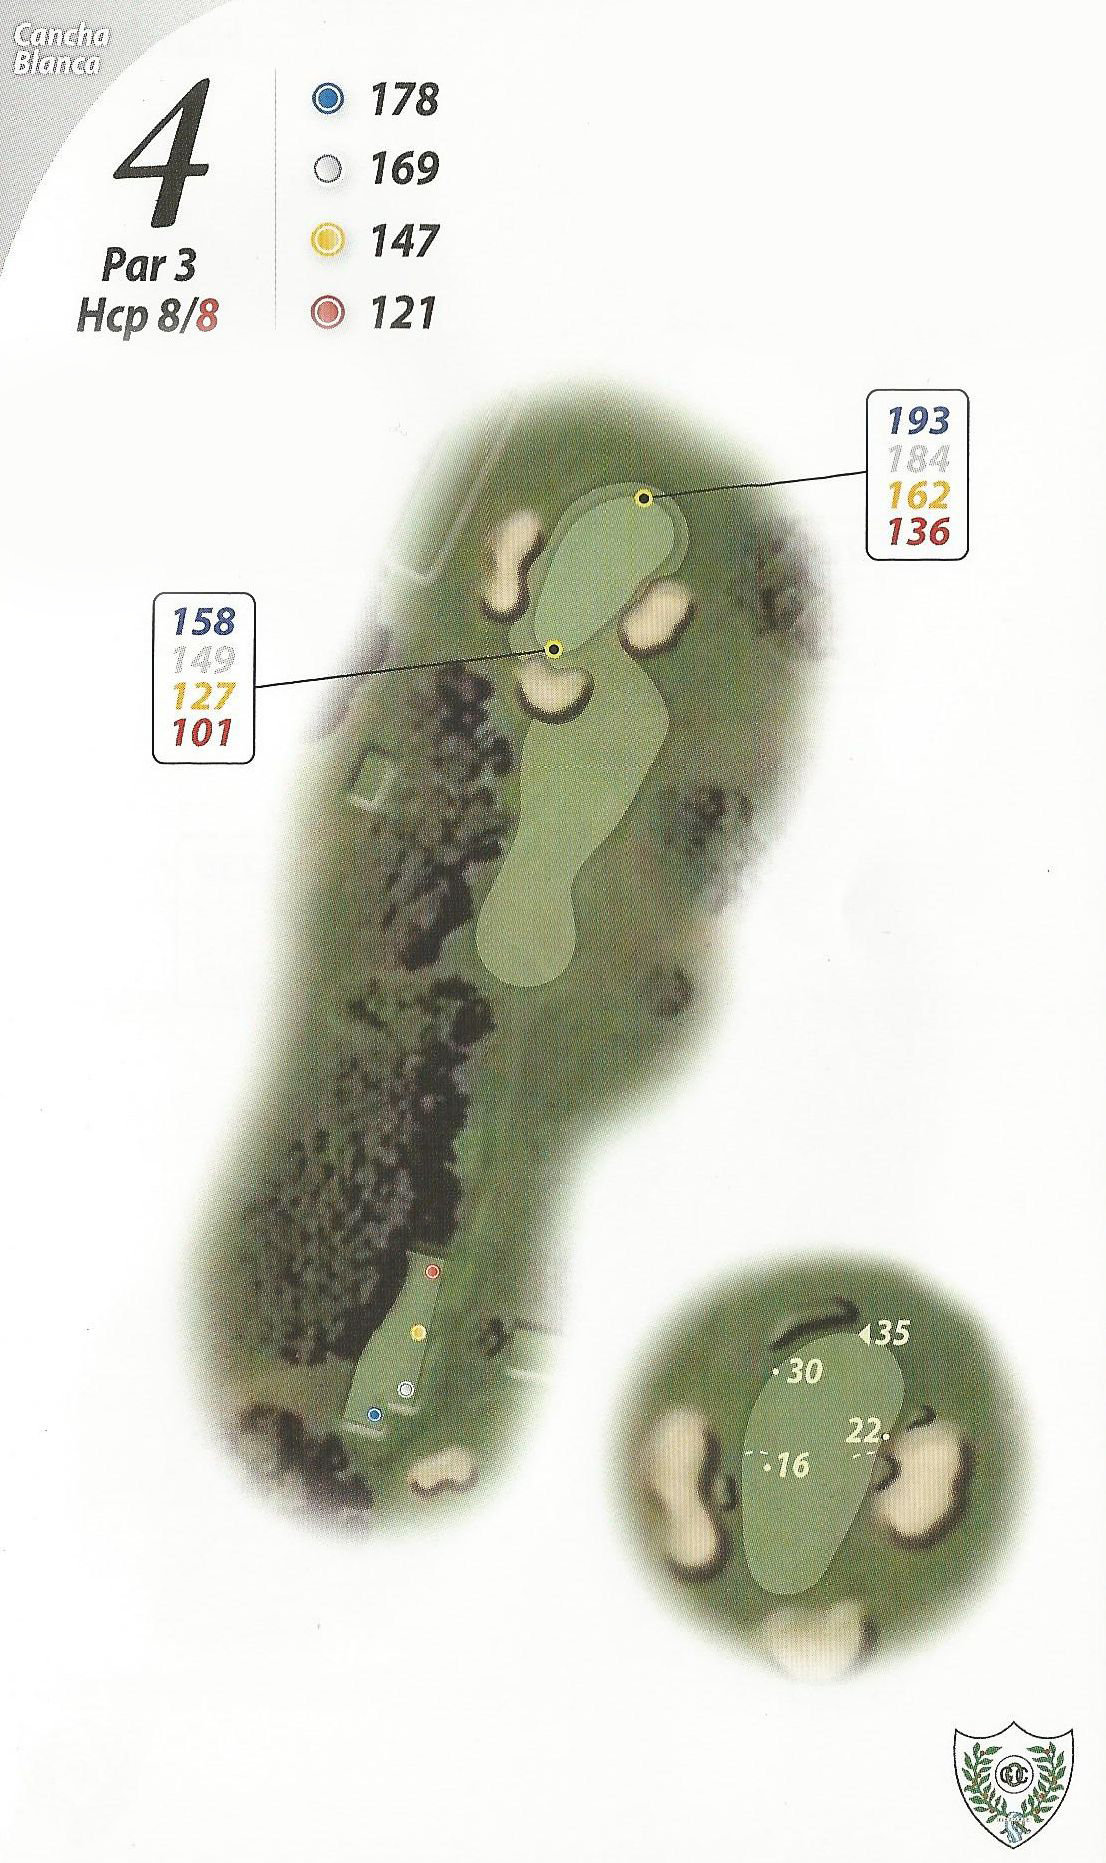
Hole 4 (White)
Par: 3 | Yards: 178
Elevated green, pointed and crossed over. It’s not easy to hit the green in regulation. If you miss left, it’ll be very hard to make two shots, because the wall of the left bunker is very high. Avoid the left! The green has a slope; it’s end is fairly more elevated than the rest. This offers various pin positions where back right is one of the toughest pin positions on the course.
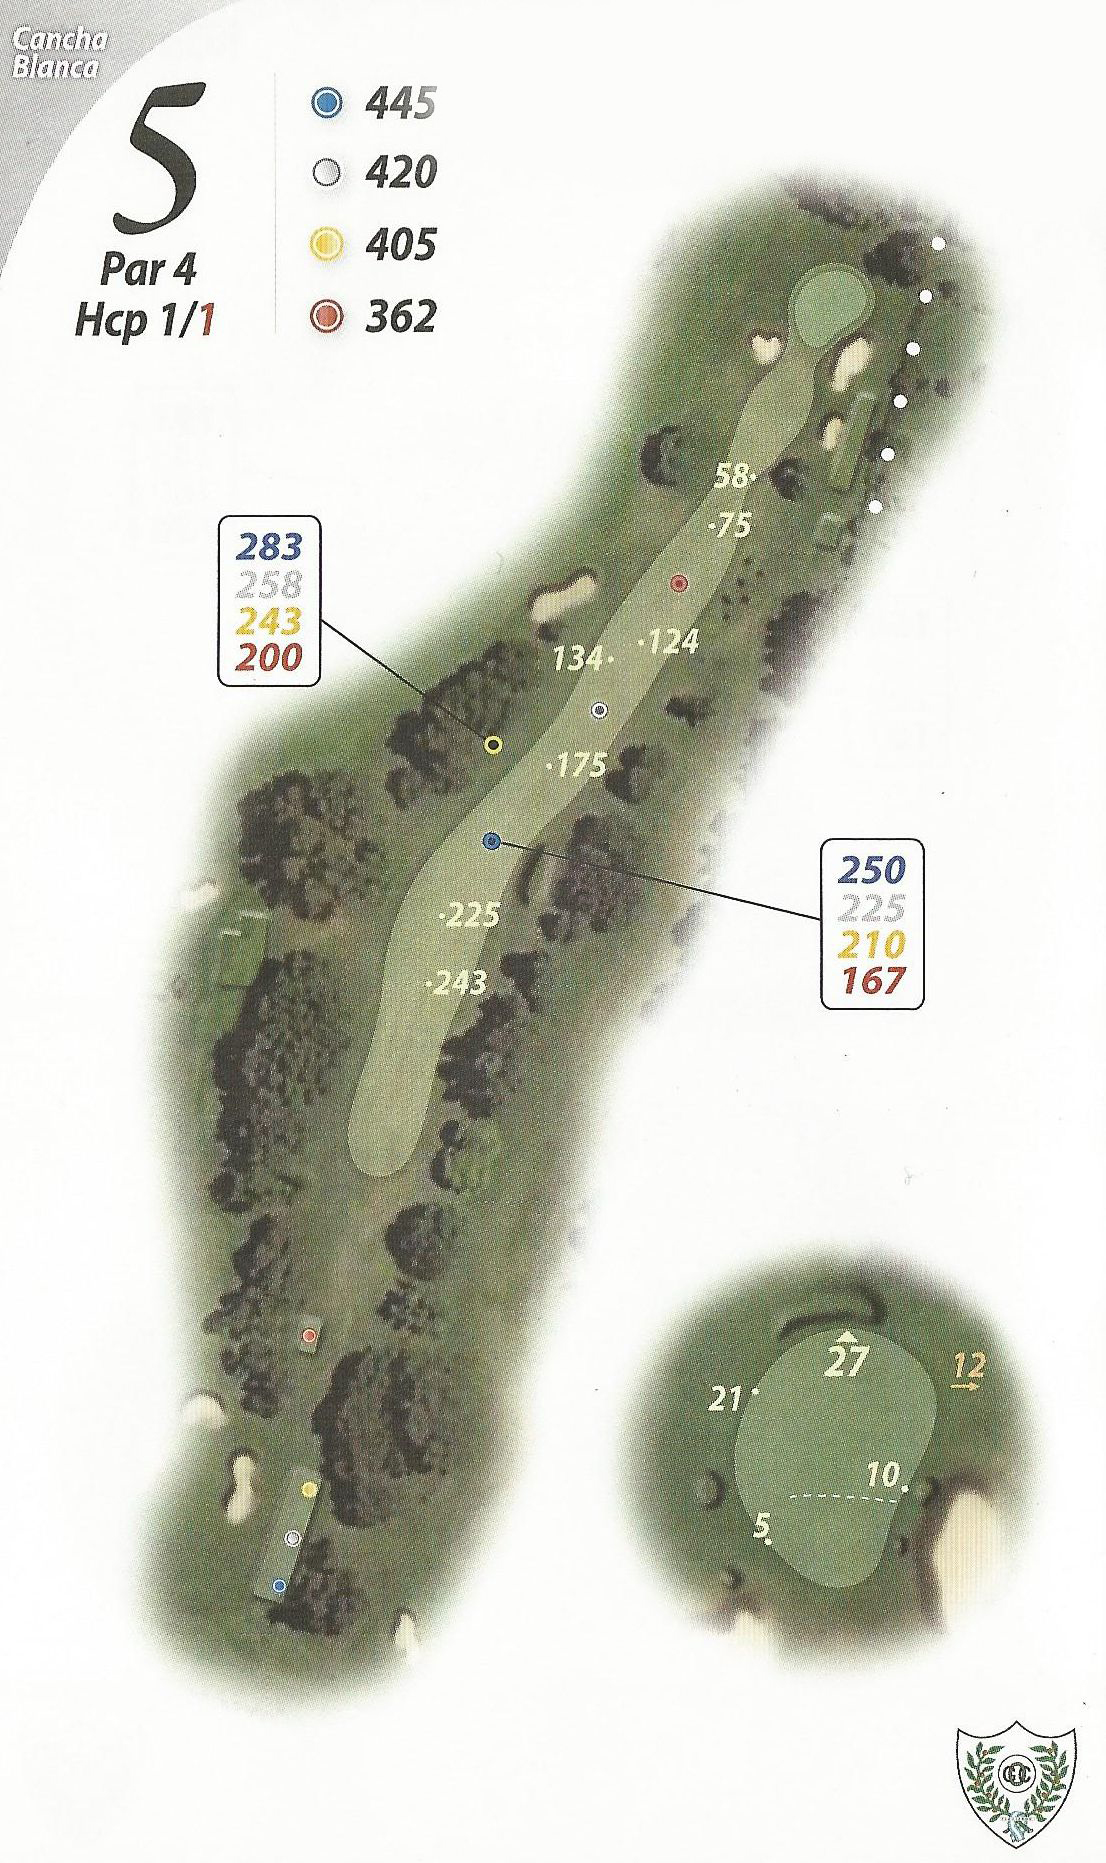
Hole 5 (White)
Par: 4 | Yards: 445
This hole is Handicap one and the most difficult one of the 27 holes. It is a smooth Dogleg right. After the landing area is goes slightly downhill to one of the most difficult greens on the course. It has a central ridge, as an inverted plate, with out of bounds on right, pretty close to the green so missed approach shots need to go left if possible.
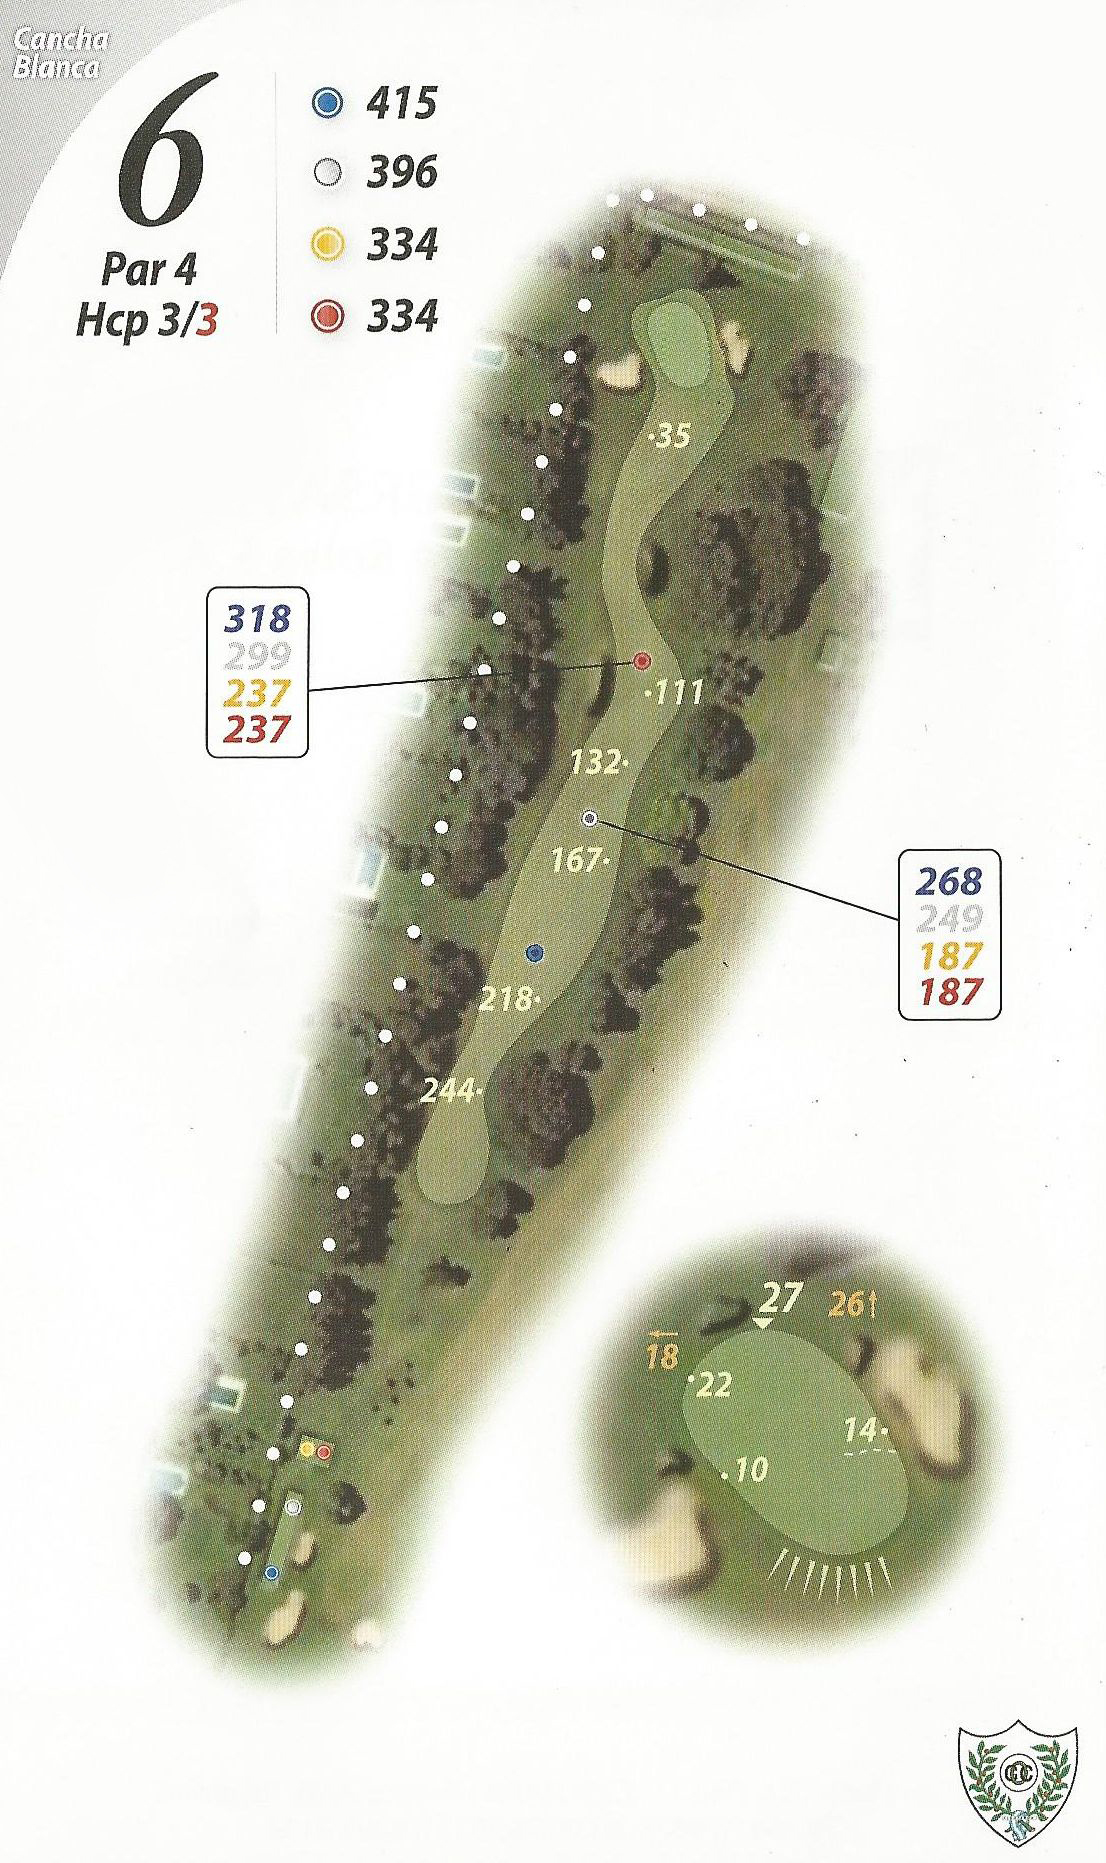
Hole 6 (White)
Par: 4 | Yards: 415
It’s almost parallel to the previous hole. The tee shot is a little bit uphill and the approach shot goes a little downhill to a very well protected green. The green is elevated and uneven. There is a eucalyptus on the right that may be an obstacle if your tee shot stands on the right side of the fairway, especially since there is out of bounds on the left.
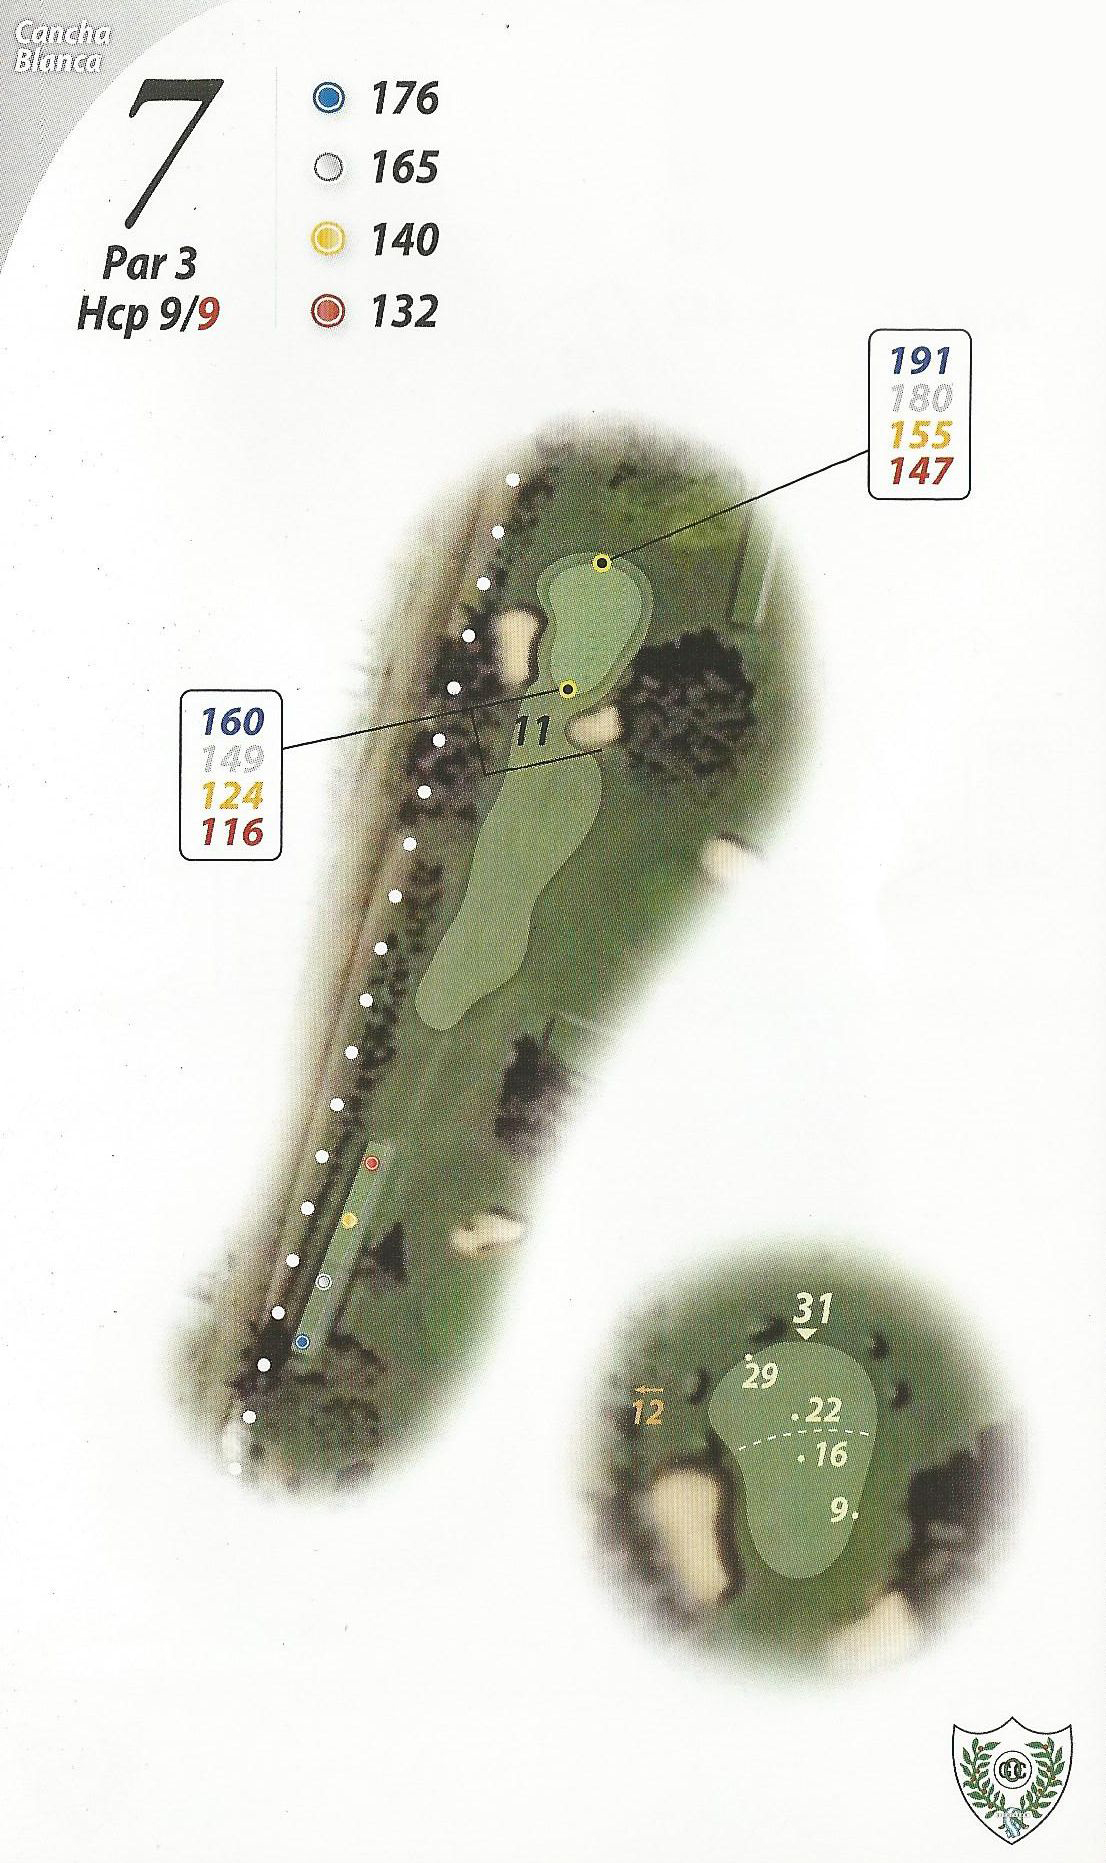
Hole 7 (white)
Par: 3 | Yards: 176
Another one of the holes that was redesigned during the 90s. It used to be a flat green and now it has a bigger and elevated green, with two platforms and with the Out of bounds on the left closer than it used to be.
When wind is blowing in your face or from right to left, the out of bounds area gets in play quite a lot, even for Pros. When standing on the tee box, the hole really doesn’t show how tough it plays.
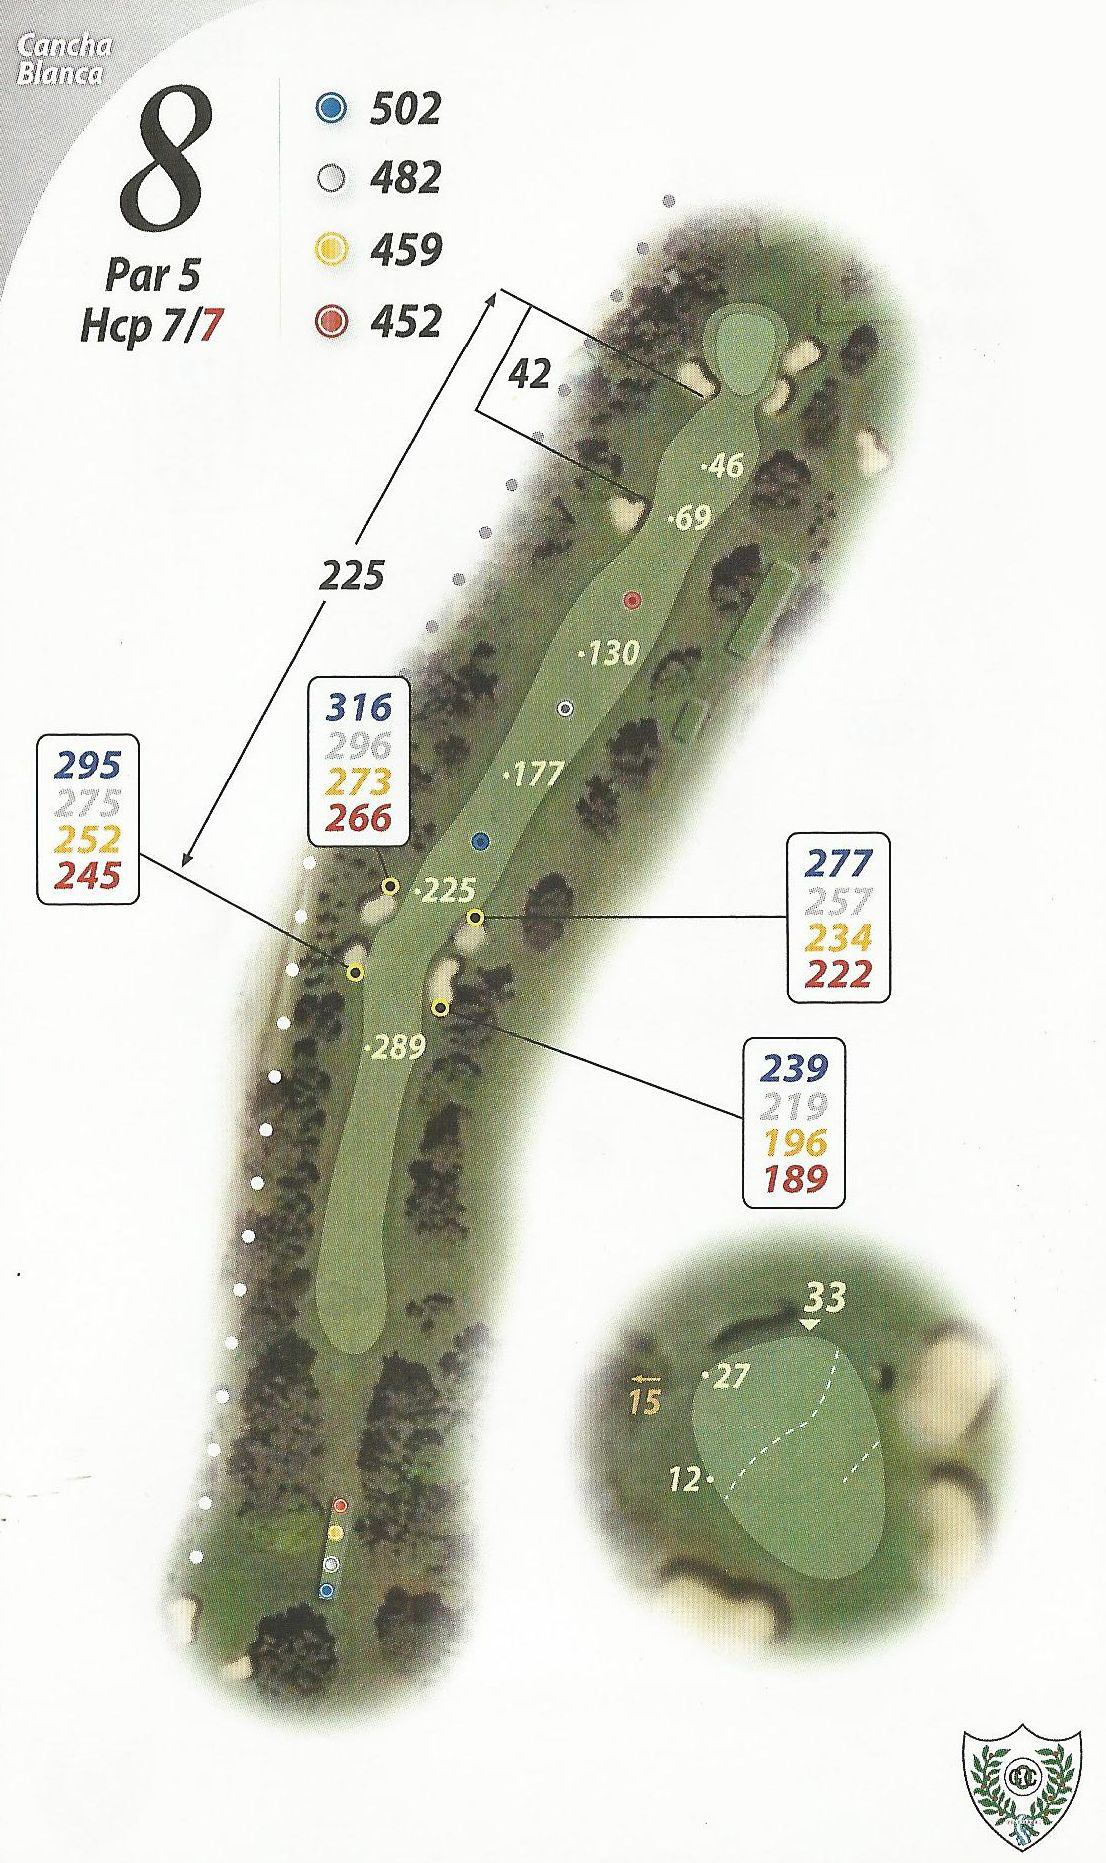
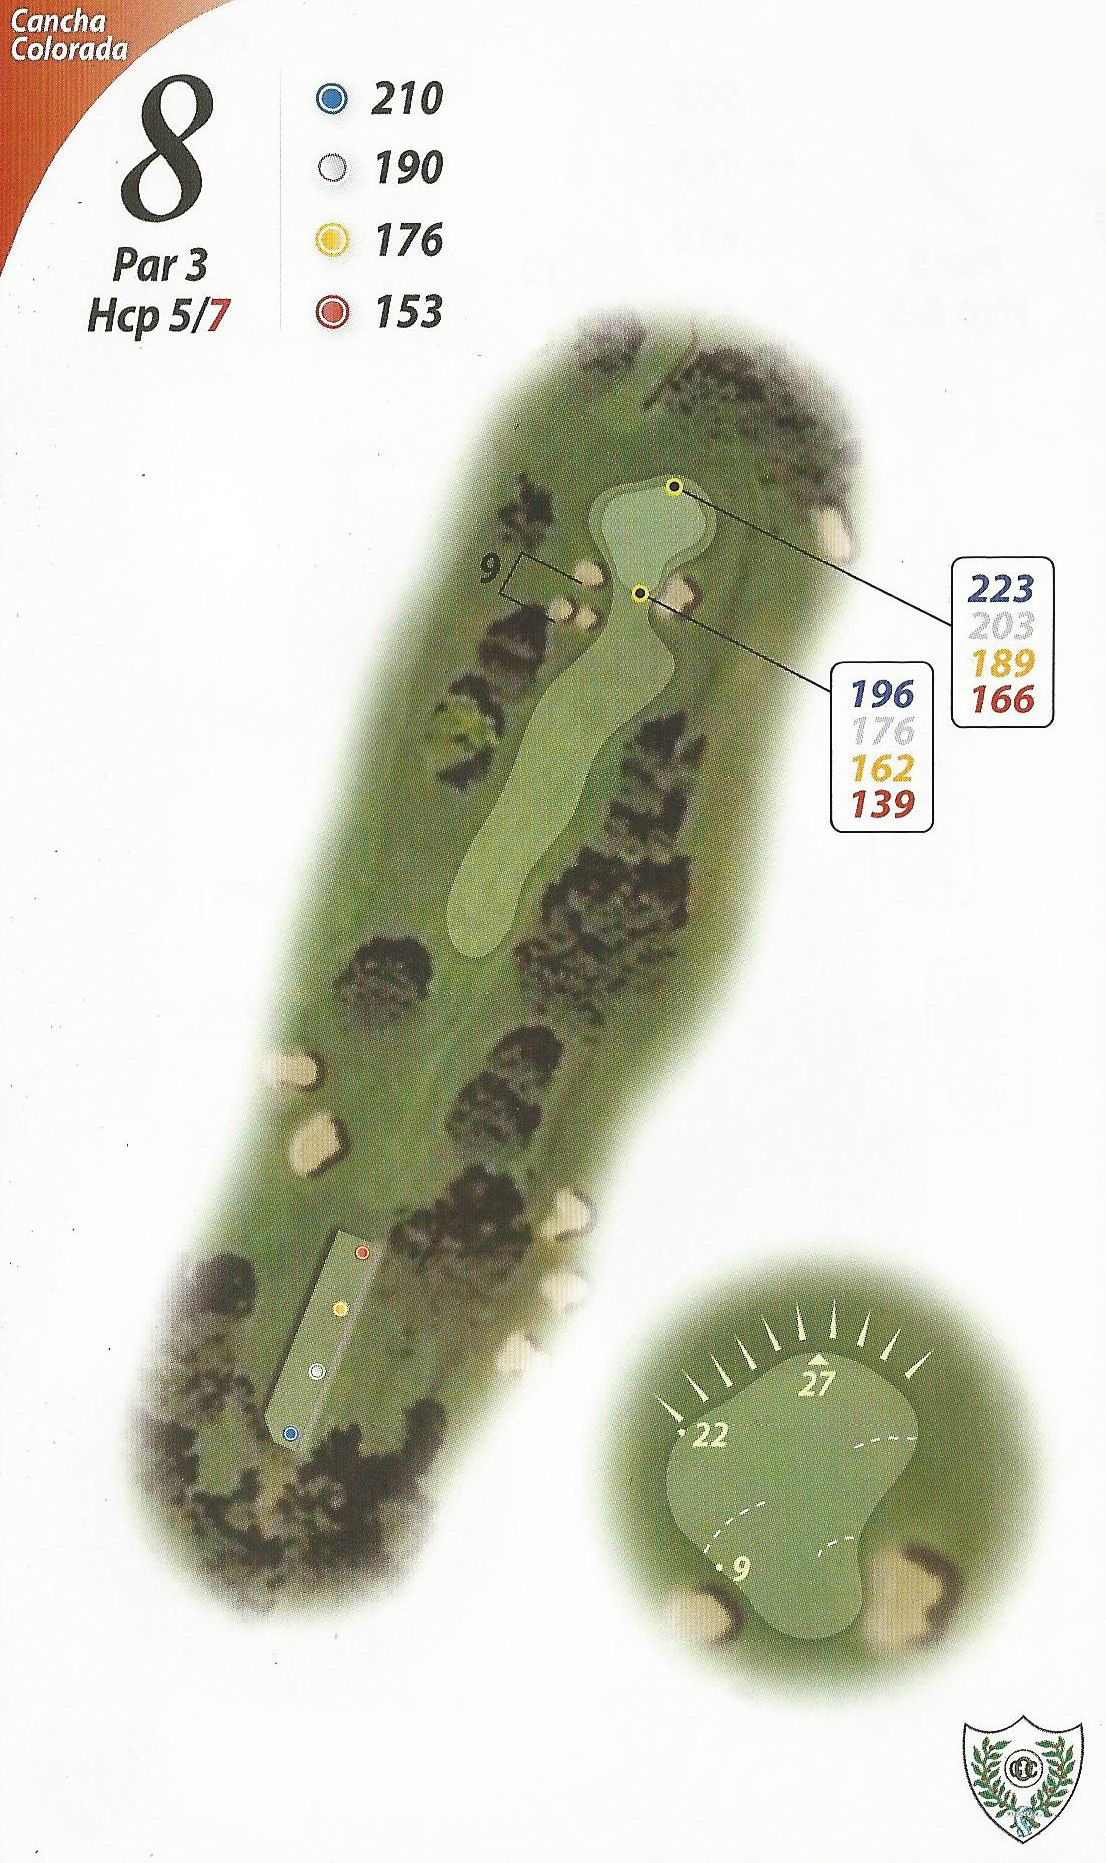
Hole 8 (white)
Par: 5 | Yards: 502
A pronounced dogleg to the right marks this short par 5, the problem is that the turning point is at 260 yards so for the tee shot a slight cut is needed or if not a shorter shot, maybe a fairway wood to avoid the three cross bunkers, two on the right and one on the left.
Once you hit a good tee shot, the green can easily be hit with the second shot. It’s maybe the best birdie chance on the course. The green isn’t very uneven, but it does break from left to right, with a small elevated platform on the left end corner of the green.
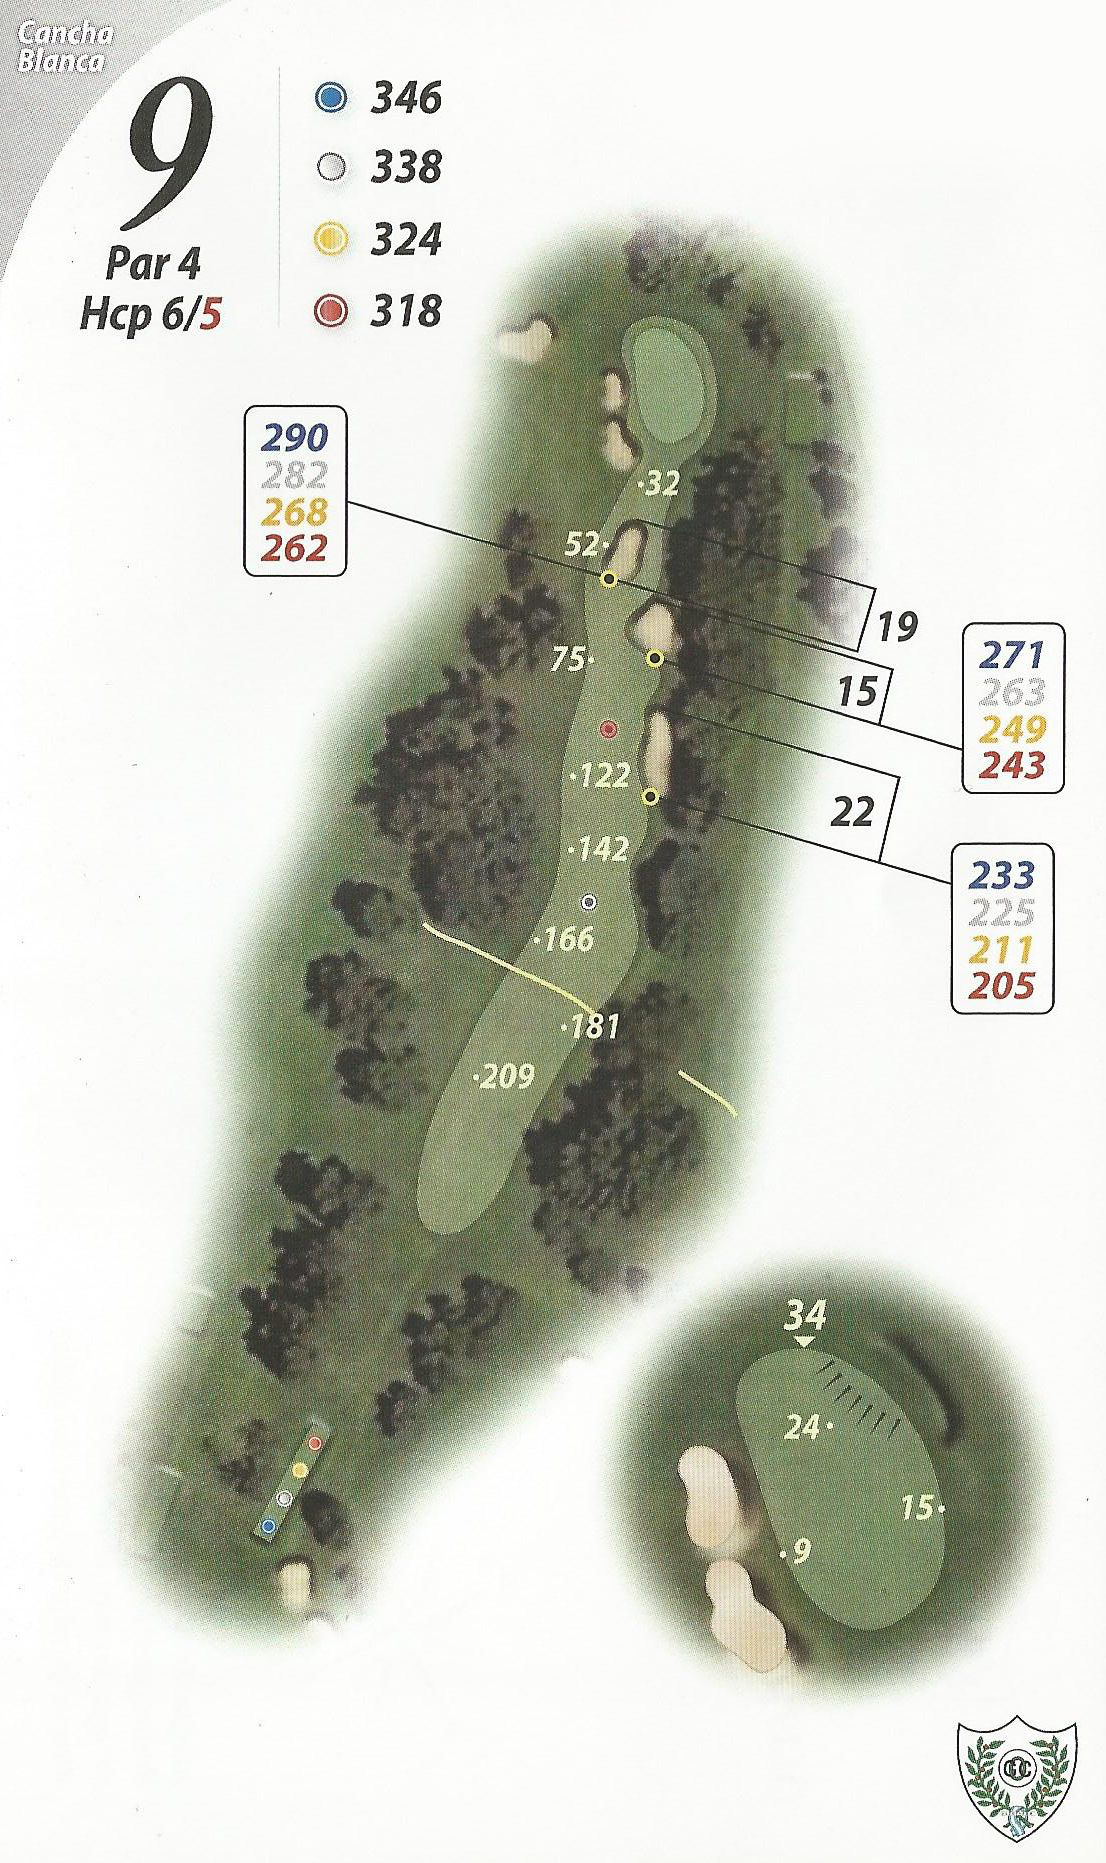
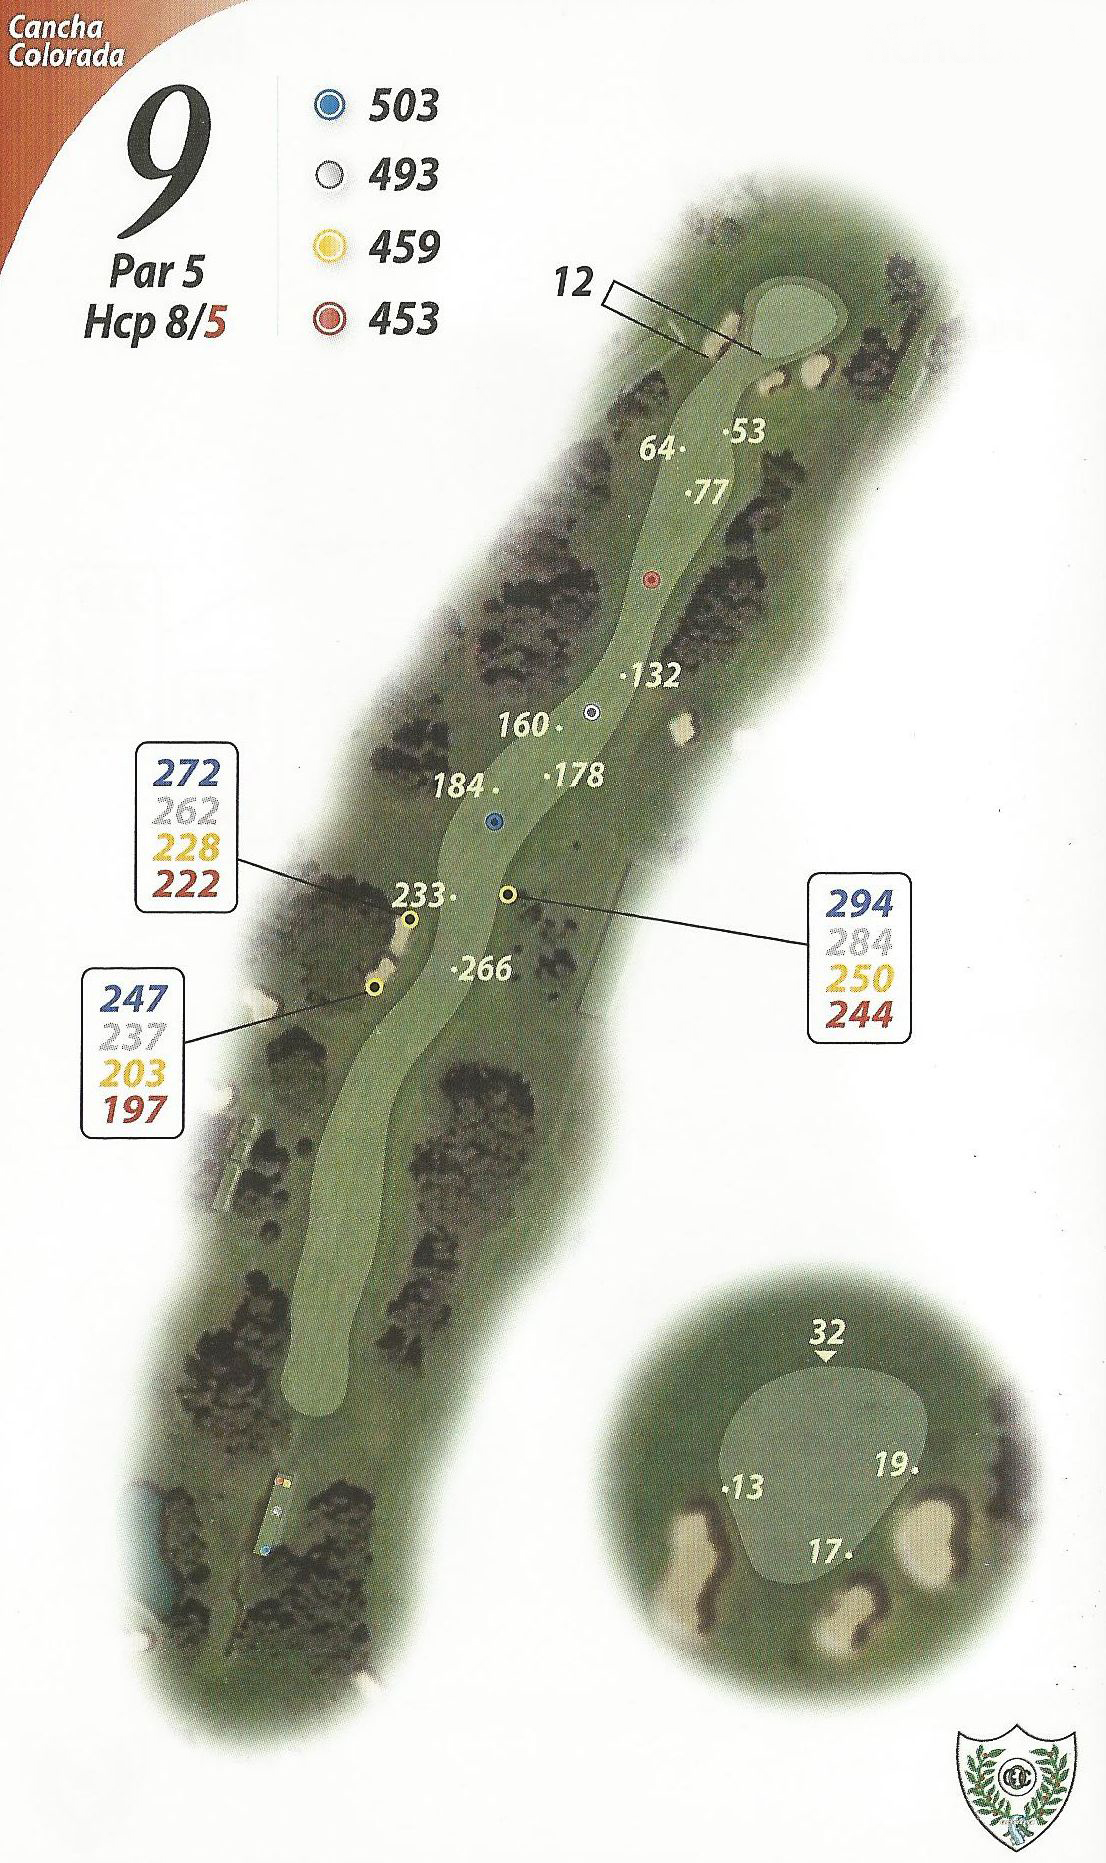
Hole 9 (white)
Par: 4 | Yards: 346
Although this is a very short hole, it is not easy. Placing the tee shot at an appropriate distance is the main target. The hole is so short that golfers like Andrés Romero and Angel Cabrera have hit the green with a 3 woods. It is one of the best and nicest holes on the course.
It goes down and then up, dogleg left. Three cross bunkers narrow the fairway progressively so golfers aiming to hit the green will have almost no landing area to place the tee shot.
The green is much more difficult than it appears. It has a very difficult hill on the right and it never shows how fast it plays!
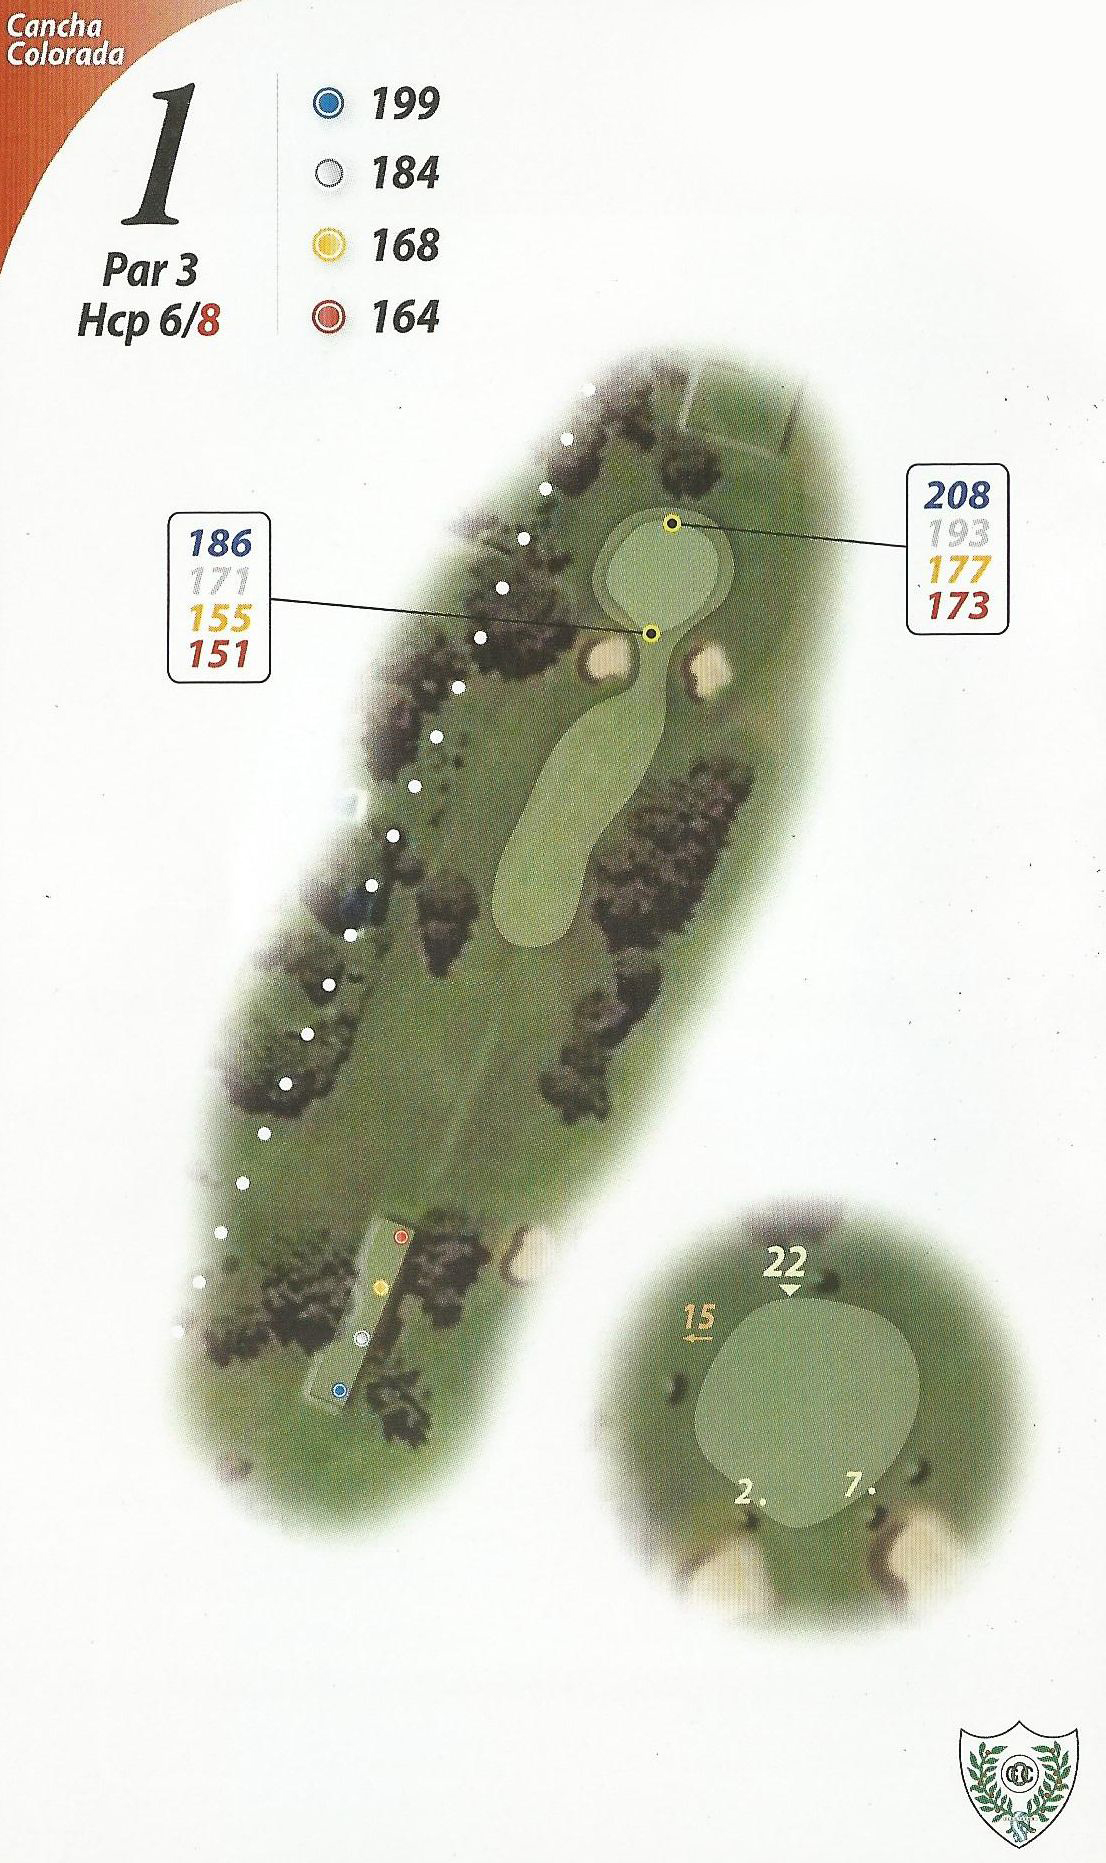
Hole 1 (Red)
Par: 3 | Yards: 199
Straight hole, elevated green and two bunkers protecting the front of this small green. Long shot, usually a long iron or even a hybrid club. Out of bounds to the left makes it mentally tougher, as if you miss to the right you will also find problems. The green is quite flat but tough to read the breaks, par will always be a great score.
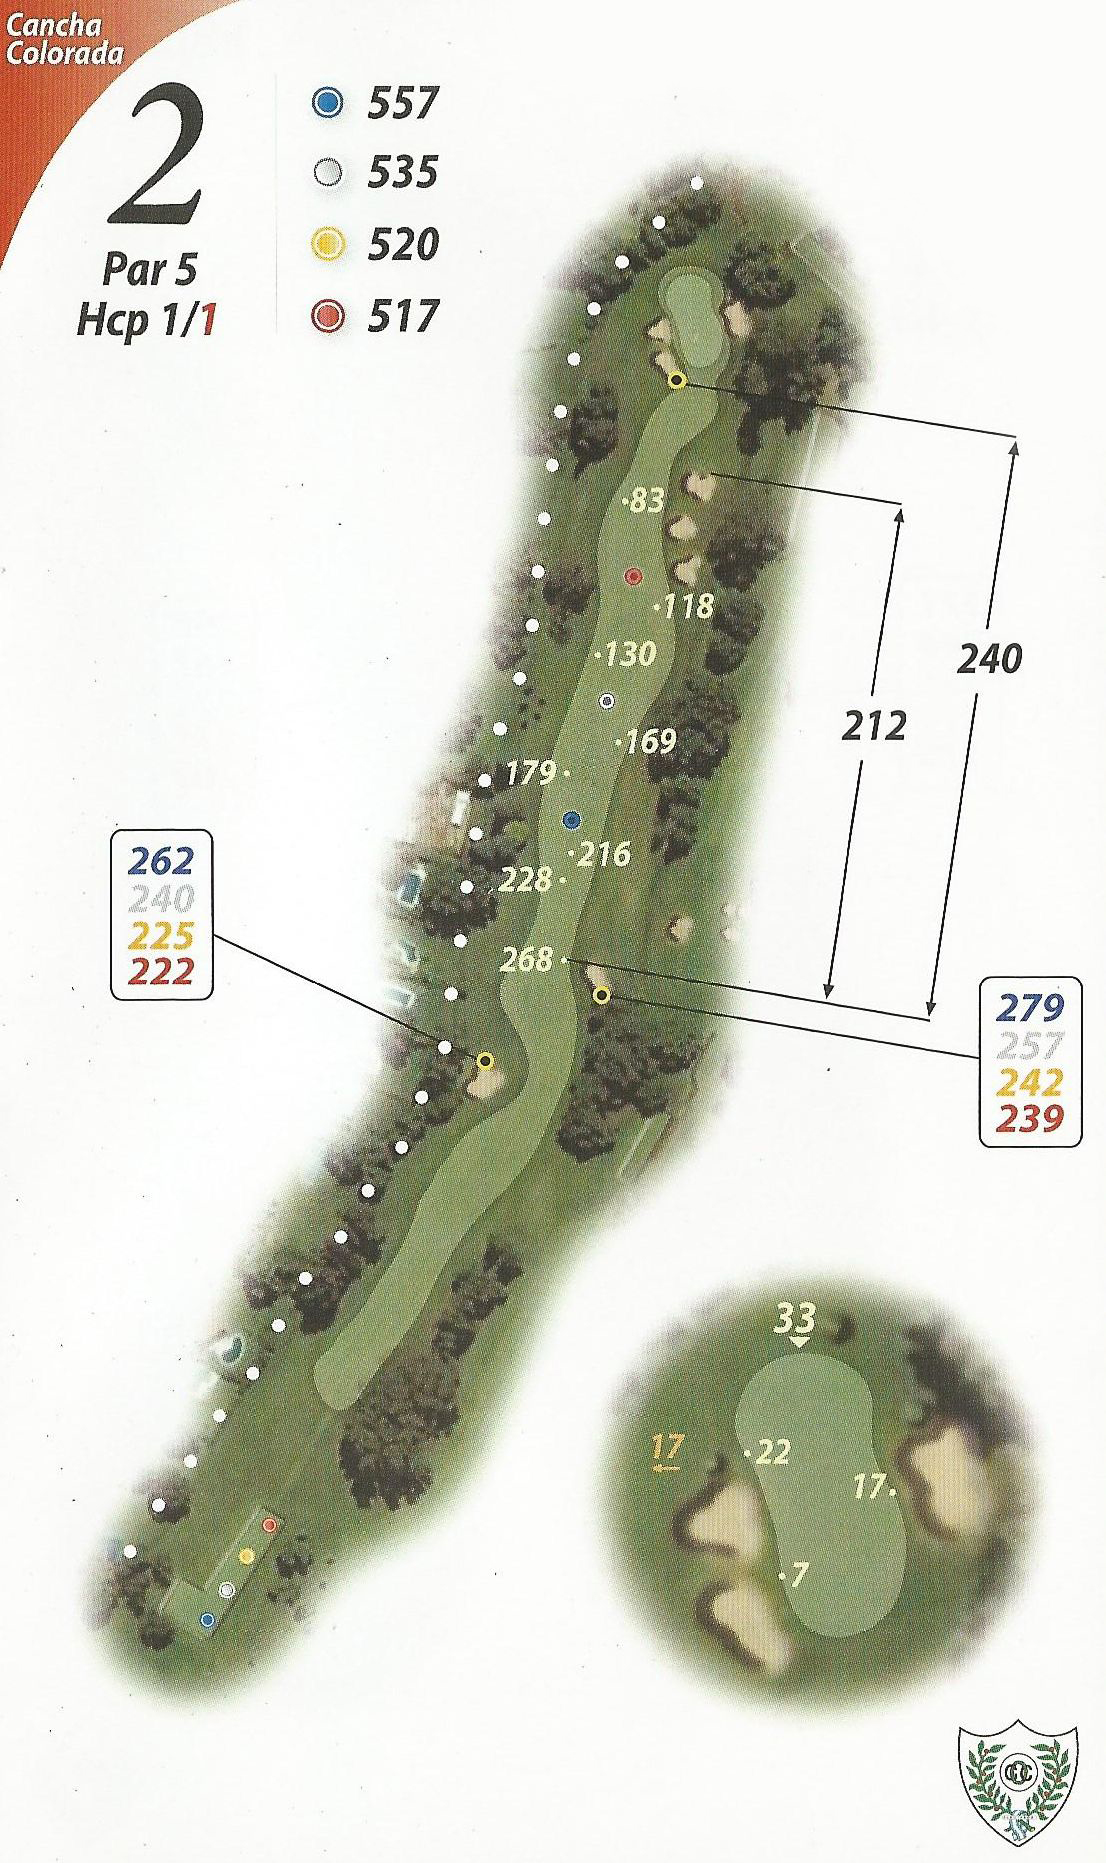
Hole 2 (red)
Par: 5 | Yards: 557
This long par 5 plays similar to hole 1 on the white course, but without the elevation changes the other one has. Its fairway goes slightly downhill and then turning left. You can fly over the left cross bunker but will probably catch the one on the right side. The hole is directed towards 3 bunkers on the right. Out of bounds on the left gets into play for all three shots.
The last 100 yards the fairway narrows and there is rough on the left side. The green is fast and crossed, with two platforms that drop towards the entry. This green also used to be simple and flat, but in the late 90s it was rebuilt creating a much more challenging hole.
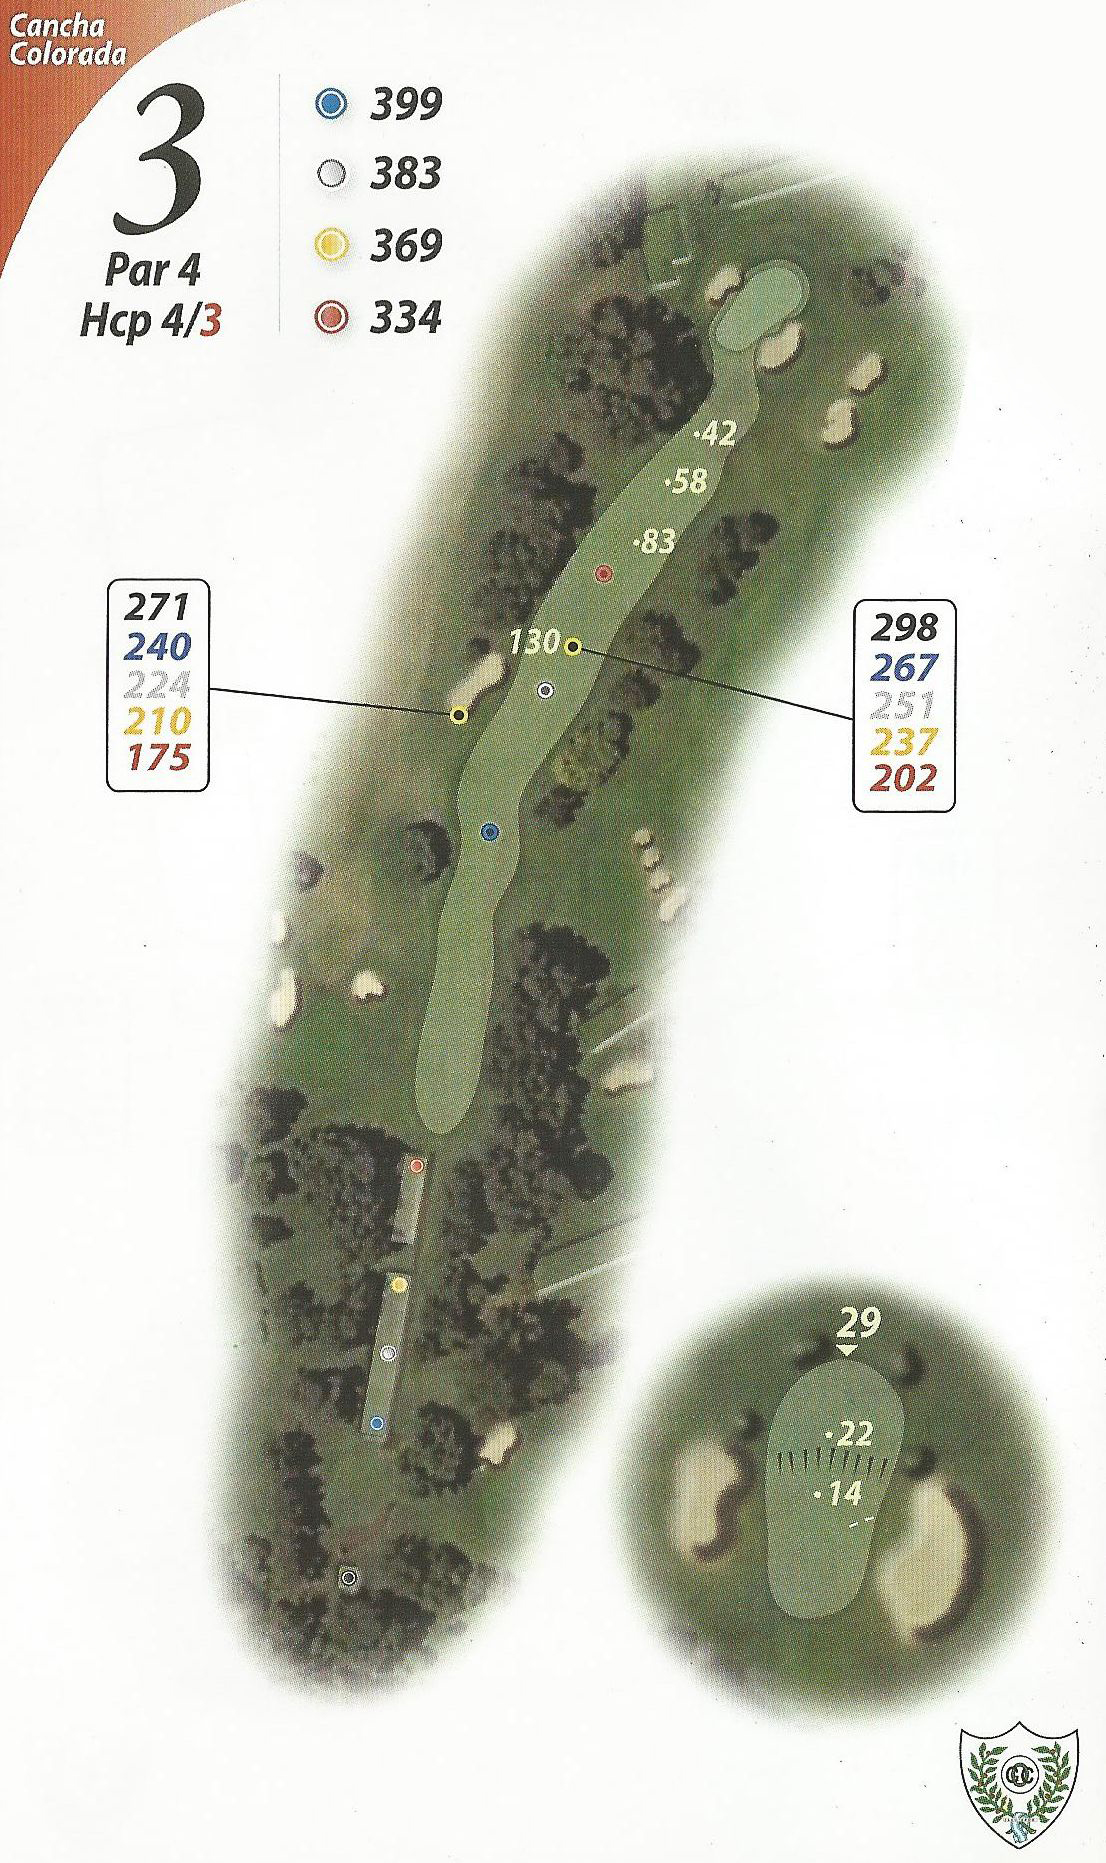
Hole 3 (red)
Par: 4 | Yards: 399
Dogleg right with bunkers on the left and dense woods on the right. It goes uphill for the tee shot then being pretty flat for the second shot. Another redesigned green during the 90s and now one of the most difficult as it is narrow, with two platforms and a strong slope from back to front. And the green has been elevated, so every shot missing the bunkers will face a mandatory flop shot to have any chance of up and down.
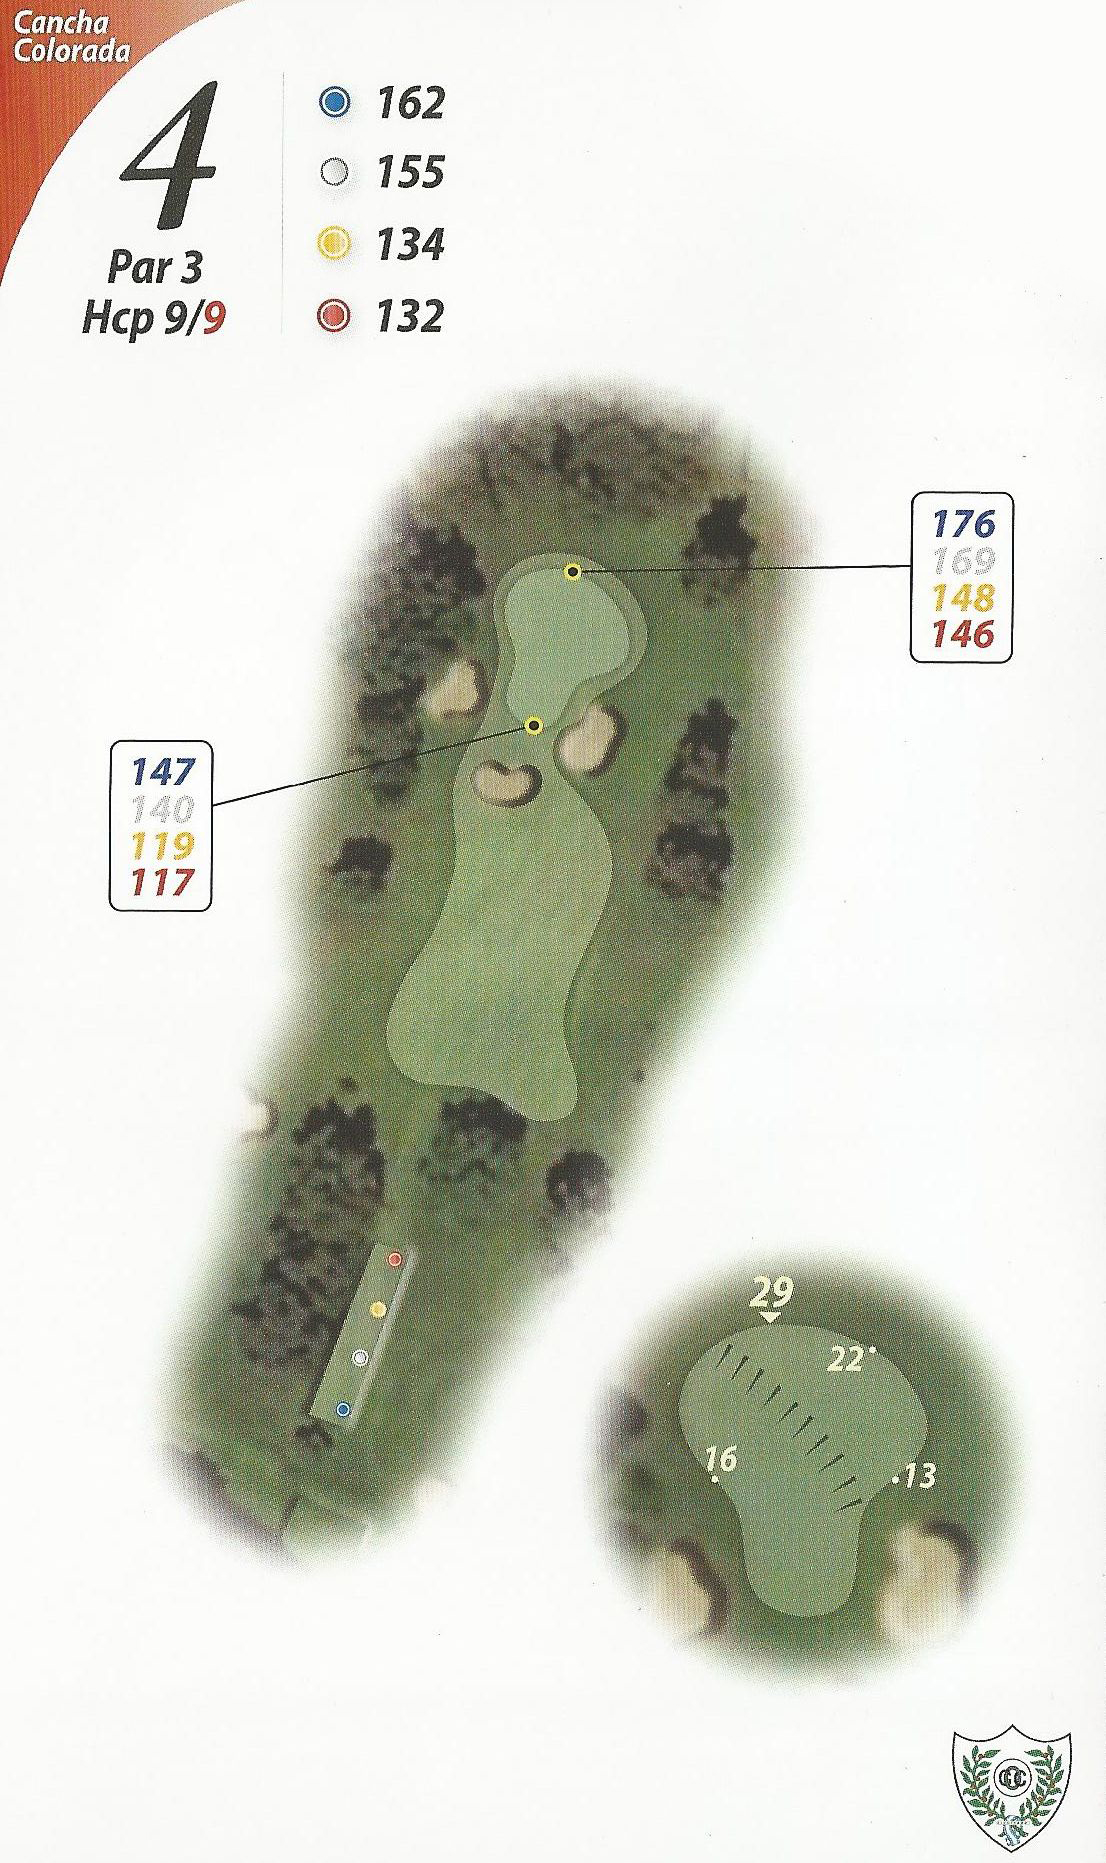
Hole 4 (red)
Par: 3 | Yards: 162
It has two sets of tees, one on the left and one on the right which give two very different angles to the tee shot to a very good green, one of the originals which was not modified and will probably never will. An eucalyptus park on the back of the green makes it a beautiful picture, one of the landmarks of the Course.
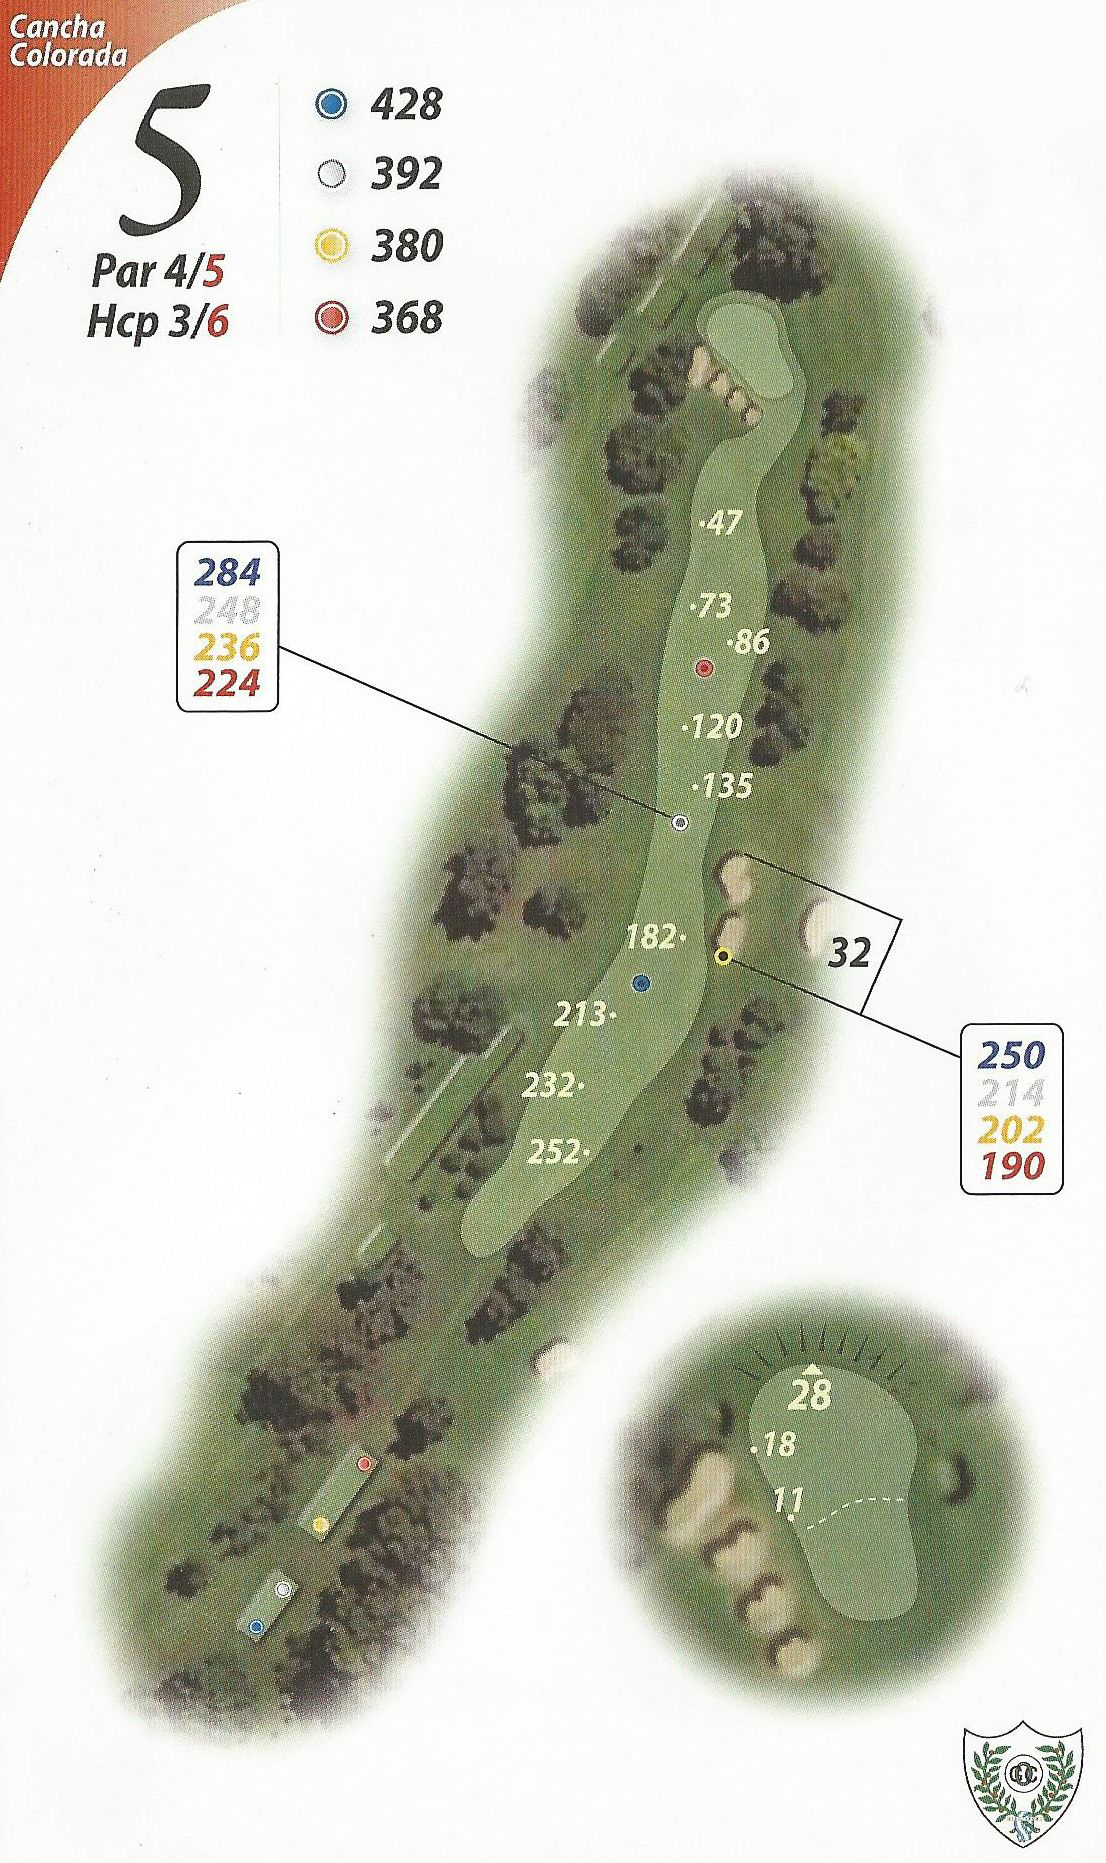
Hole 5 (Red)
Par: 4 | Yards: 428
A very challenging hole, dogleg left with two huge cross bunkers and a hill on the right. The green keeps an orientation with the tee box so when in the fairway for the approach shot it seems a little bit out of place. This hole was the biggest change in the 90s, where a small and flat green was turned into a high and very tough one, with 4 pot bunkers protecting the entrance and where you can only get by air, no bump and run shots. The pin position determines the shot. Better short than long!
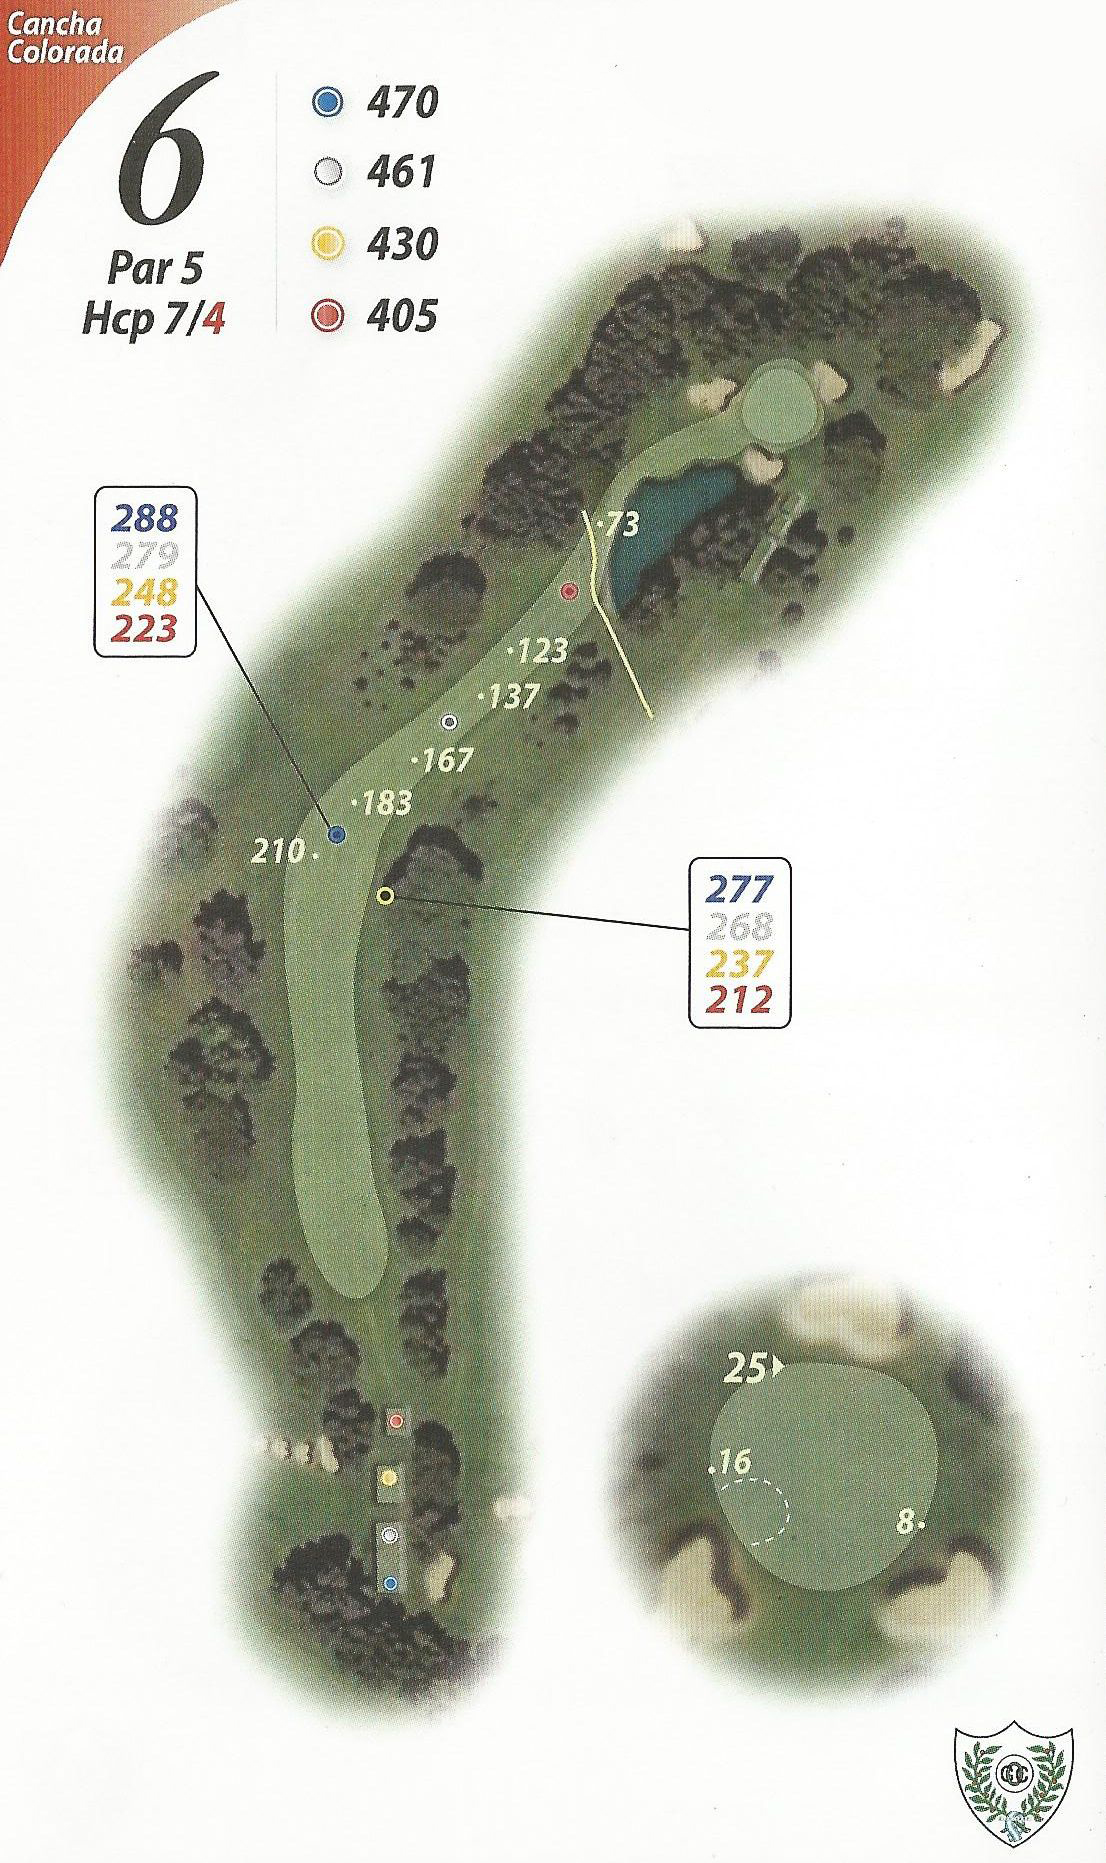
Hole 6 (red)
Par: 5 | Yards: 470
This is the Club’s signature hole. It’s featured in the book “1001 holes you need to play before you die” and certificated as one of the world’s top 500 golf holes. It goes straight and mildly ascending, with a dense wood on the right side of the fairway. Then it descends up to the green, with a water hazard short on the right and three bunkers protecting the green. One of the best holes in terms of risk – reward for amateurs, as going for the green in two shots may lead to very high numbers.
It looks a lot like Augusta and plays similar to 15th there too: the unevenness of the land, the lake, the trees…
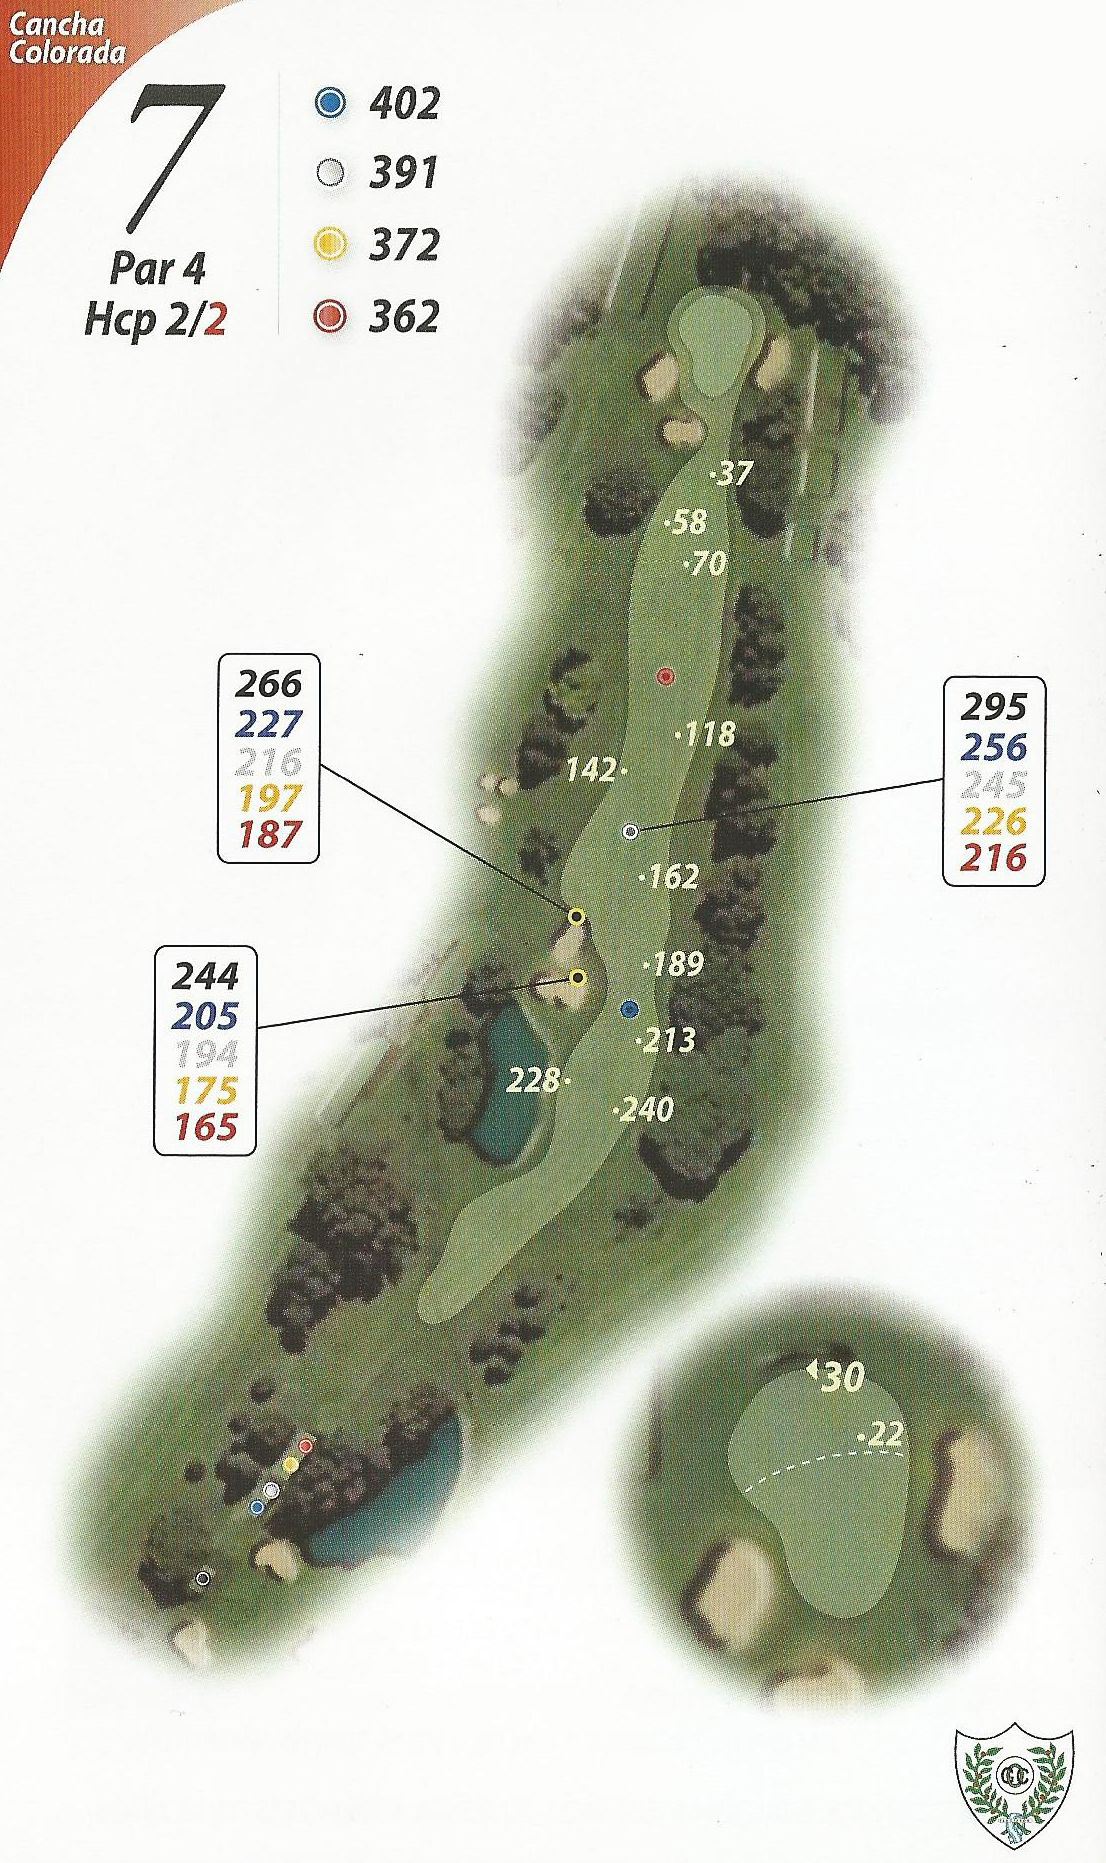
Hole 7 (Red)
Par: 4 | Yards: 402
This hole goes slightly uphill for the tee shot with a water hazard on the left and bunkers over the hazard, with dense woods on the right so extreme precision is needed from the tee box. The green is quite flat, one of the easiest in the course and also one that remains the same since the course opened.
Hole 8 (Red)
Par: 3 | Yards: 210
One of the most challenging holes in the course. The green is demanding; it has 3 very deep, small and uncomfortable pot bunkers on the left and another one on the right. The wind is crucial. It is a long par 3 so sometimes even a bogey 4 is not a bad score.
This is another green that went over a major change in the 90s where a small flat green turned into an elevated one, with very marked breaks for the putting surface and where the shots from beside the green are quite tough.
Hole 9 (red)
Par: 5 | Yards: 503
Some say 18th at Cypress Point is the nicest walk of the 17 holes course. In this case we could say something similar. It is not a bad hole, but is still the weakest one of the championship course, it’s one of the Club’s weaknesses.
It climbs up to the Club House, with a eucalyptus wood on the right side and bunkers on the left.
Professional players find it too easy, too comfortable. Some club members claim that it allows you to end your round contentedly, leaving you with a positive feeling. But it doesn’t bring any thrill to the end of the round, nothing surprising will happen. Maybe the solution would be a tougher green, but this will not happen soon.

Hole 1 (Blue)
Par: 4 | Yards: 405
Very tall oak trees on the left side of the fairway make it impossible for a straight tee shot. There are two cross bunkers on the right side that constrains the landing area.The second shot is uphill to another tough to read small green. This hole could easily be part of the Championship venue.
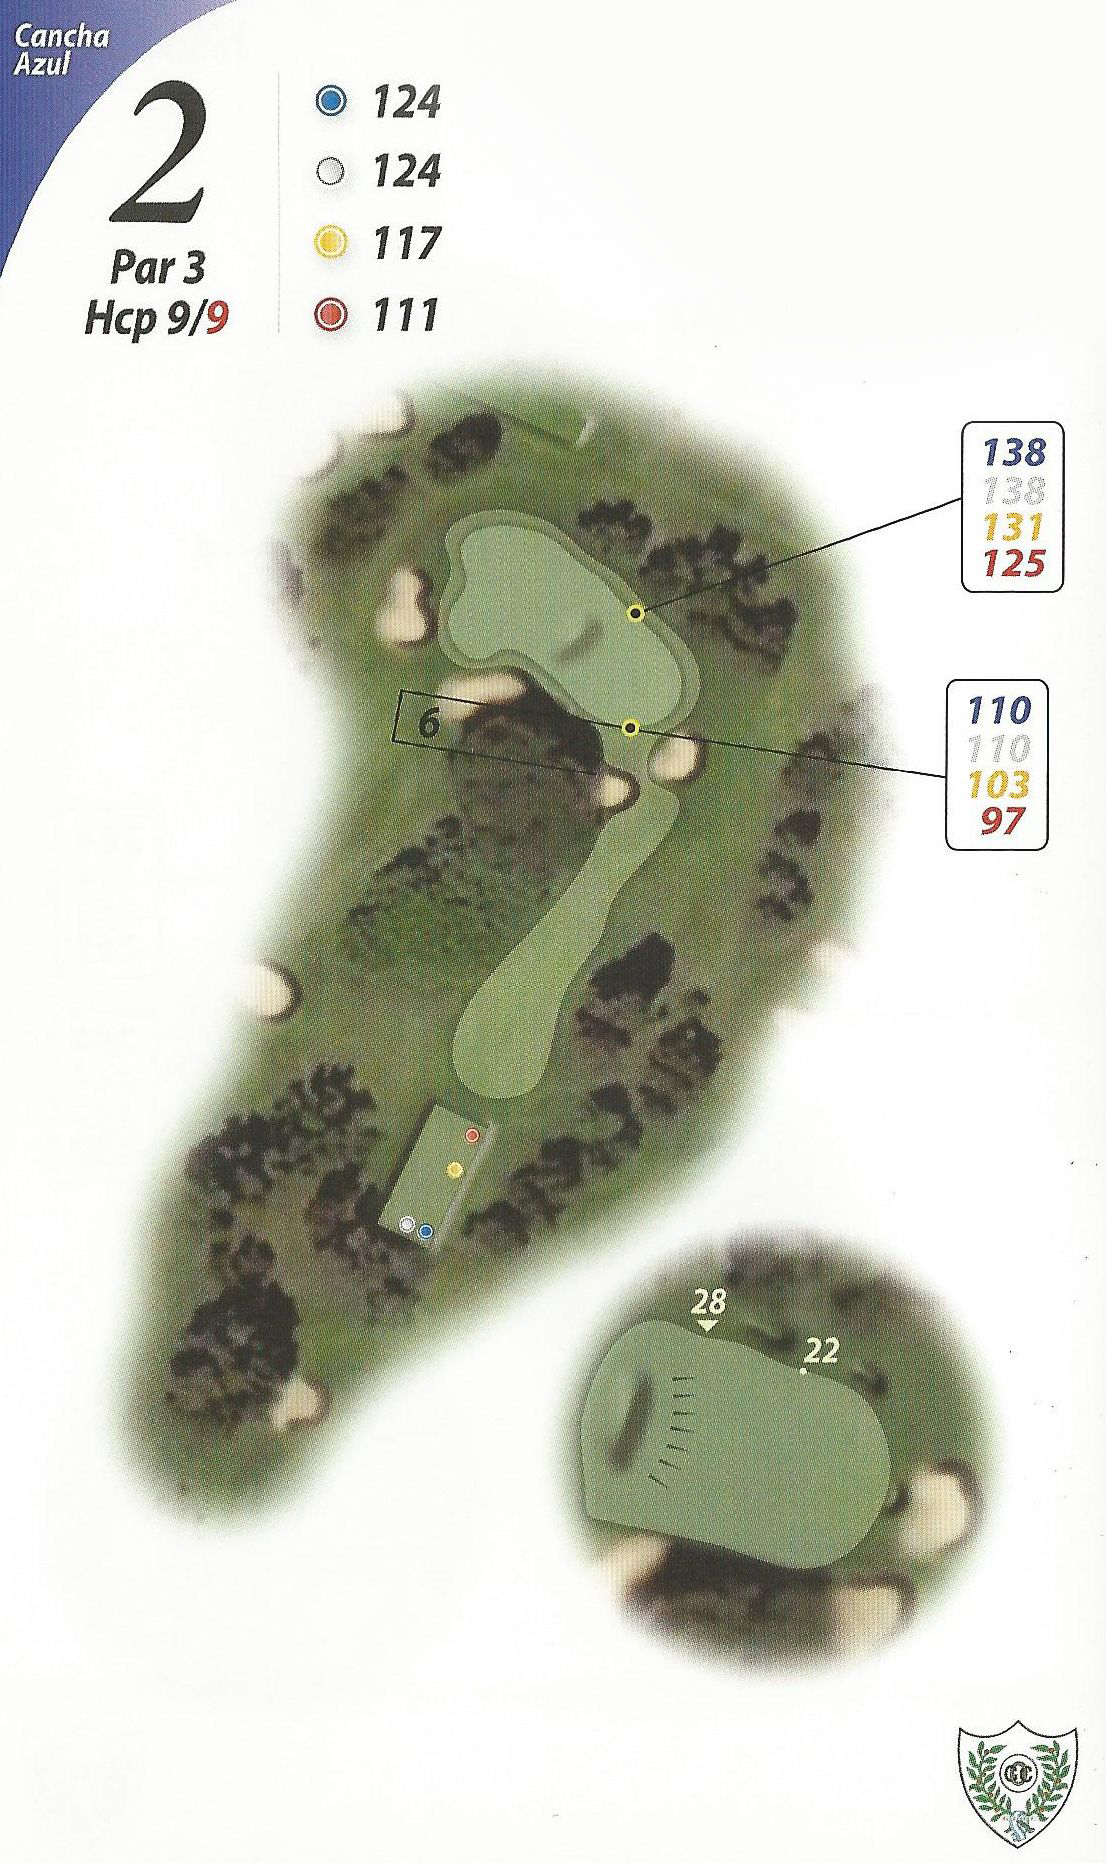
Hole 2 (Blue)
Par: 3 | Yards: 124
This hole is of clear inferior level than the rest of the course. Its green is linked to the one in 2nd hole of the championship course. Very short par 3 where the only real challenge is a bunch of pine trees on the left that make it necessary to hit a high tee shot to the green.
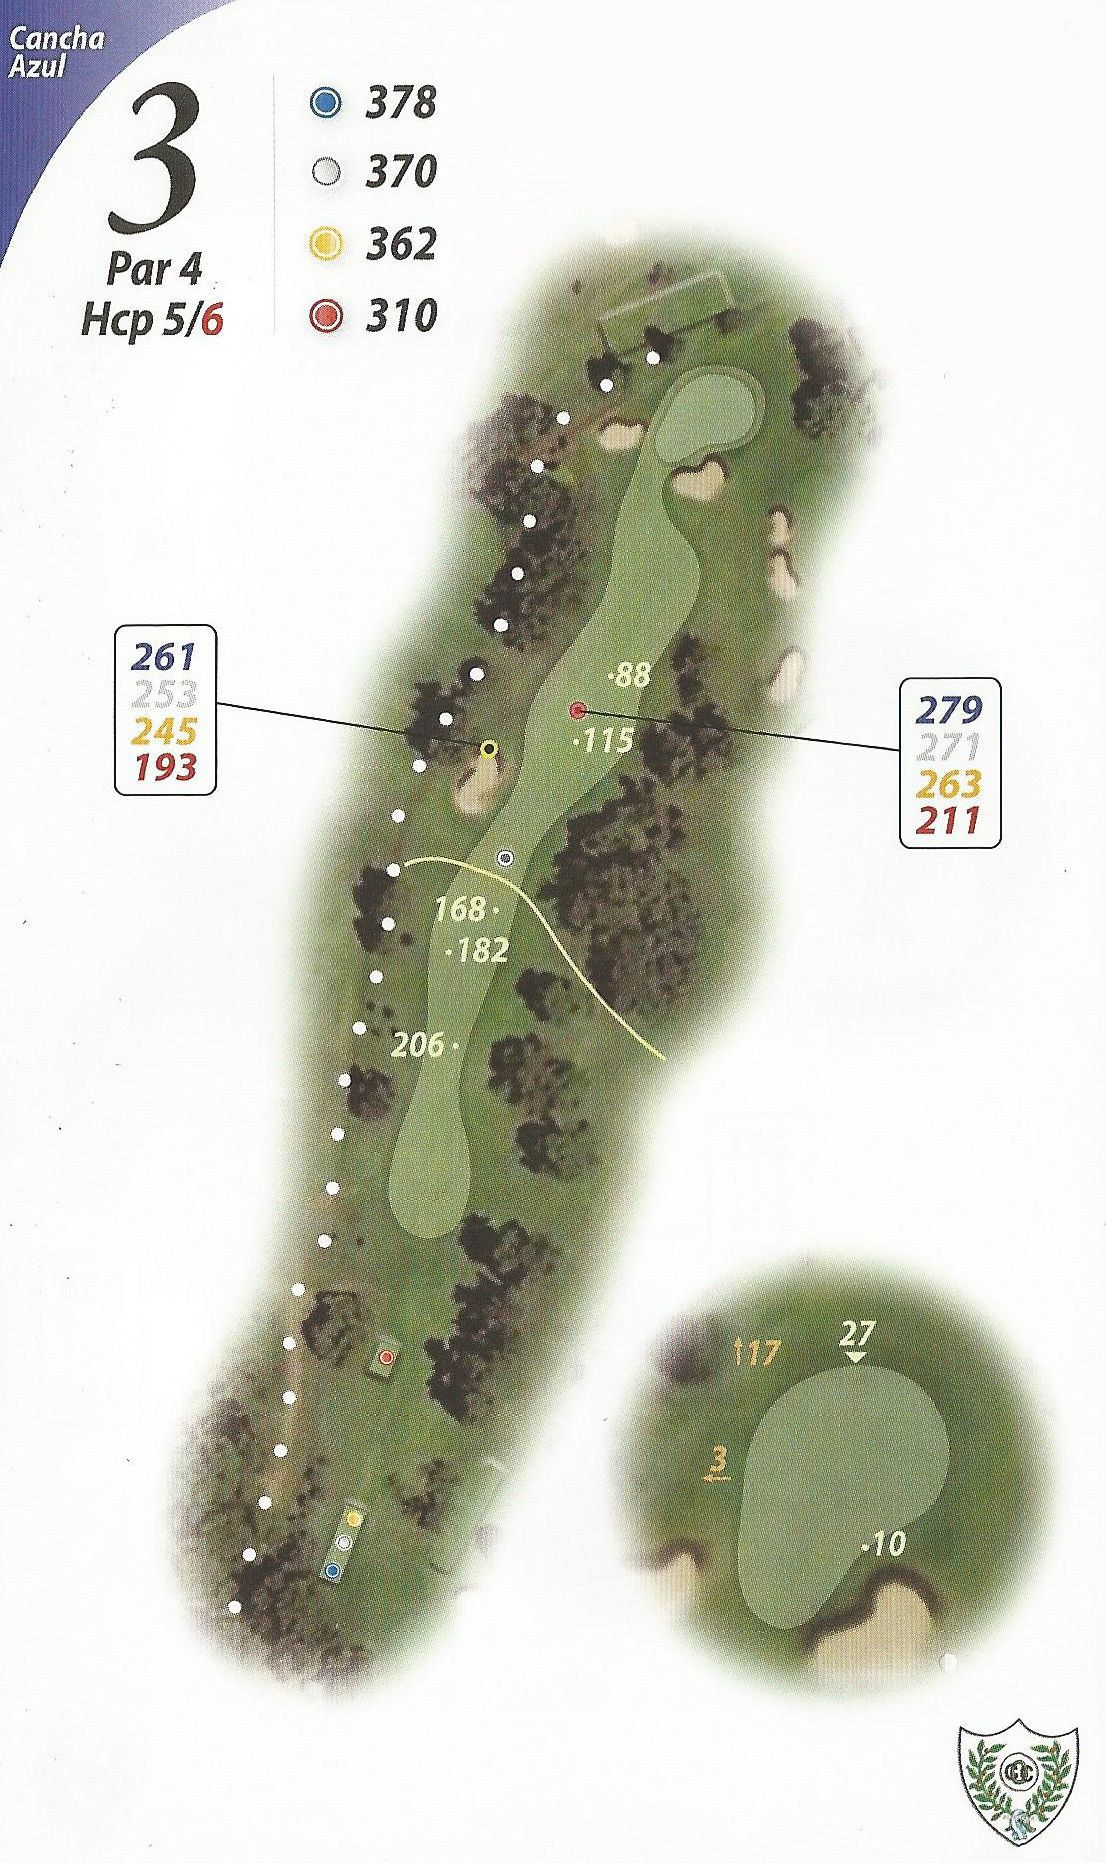
Hole 3 (Blue)
Par: 4 | Yards: 378
During the 90s this hole used to be the 9th of the Championship Course, as it runs parellell to that hole. They both play very similar, being this one maybe tougher but not as nice, even though it is beautiful.
Out of bounds on the left make the tee shot the most important part of the hole, then the approach shot is pretty easy.
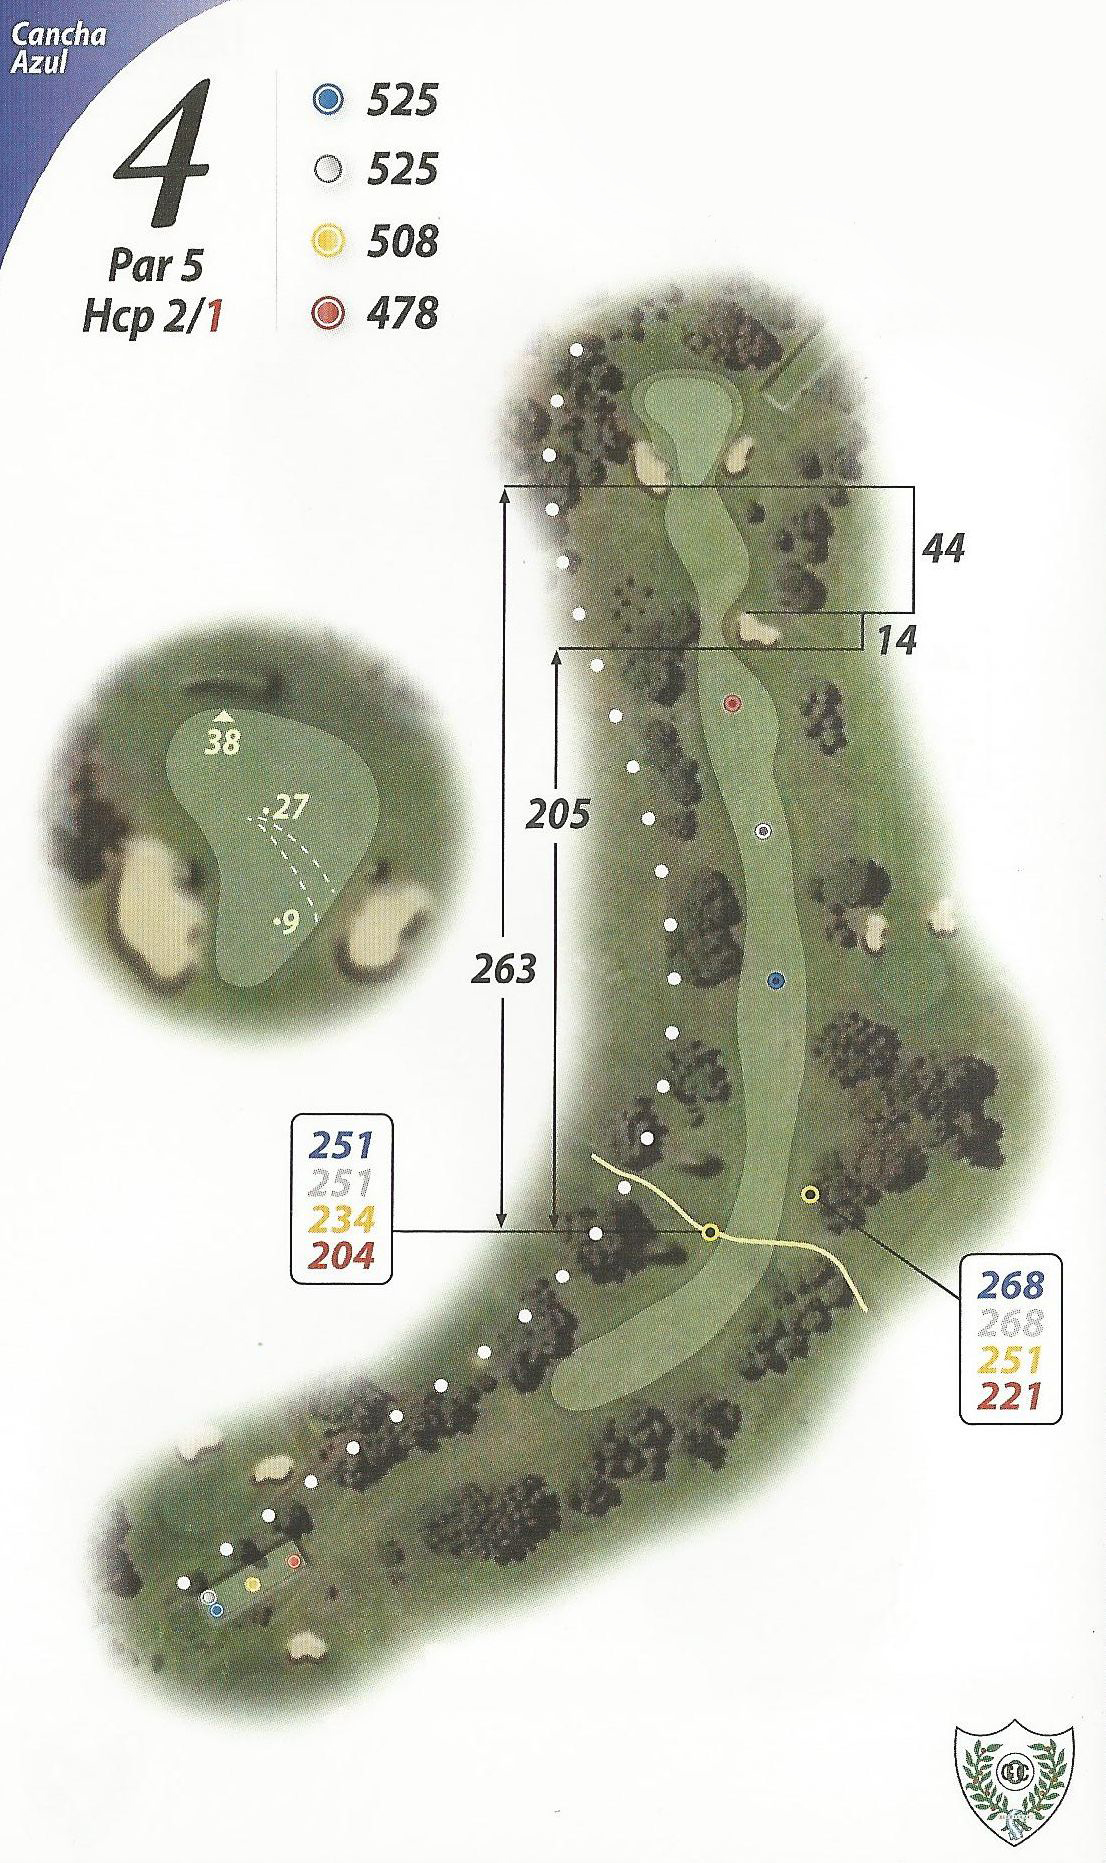
Hole 4 (Blue)
Par: 5 | Yards: 525
This hole is the weakest hole on the entire property. It’s almost a semicircle: a very uncomfortable, tough hole for the average golfer and the tee shot has to turn strong left if you want to have a chance of hitting the green in 2 shots.
Second shot is well protected by bunkers and out of bounds on the left, being the third shot not tough at all.
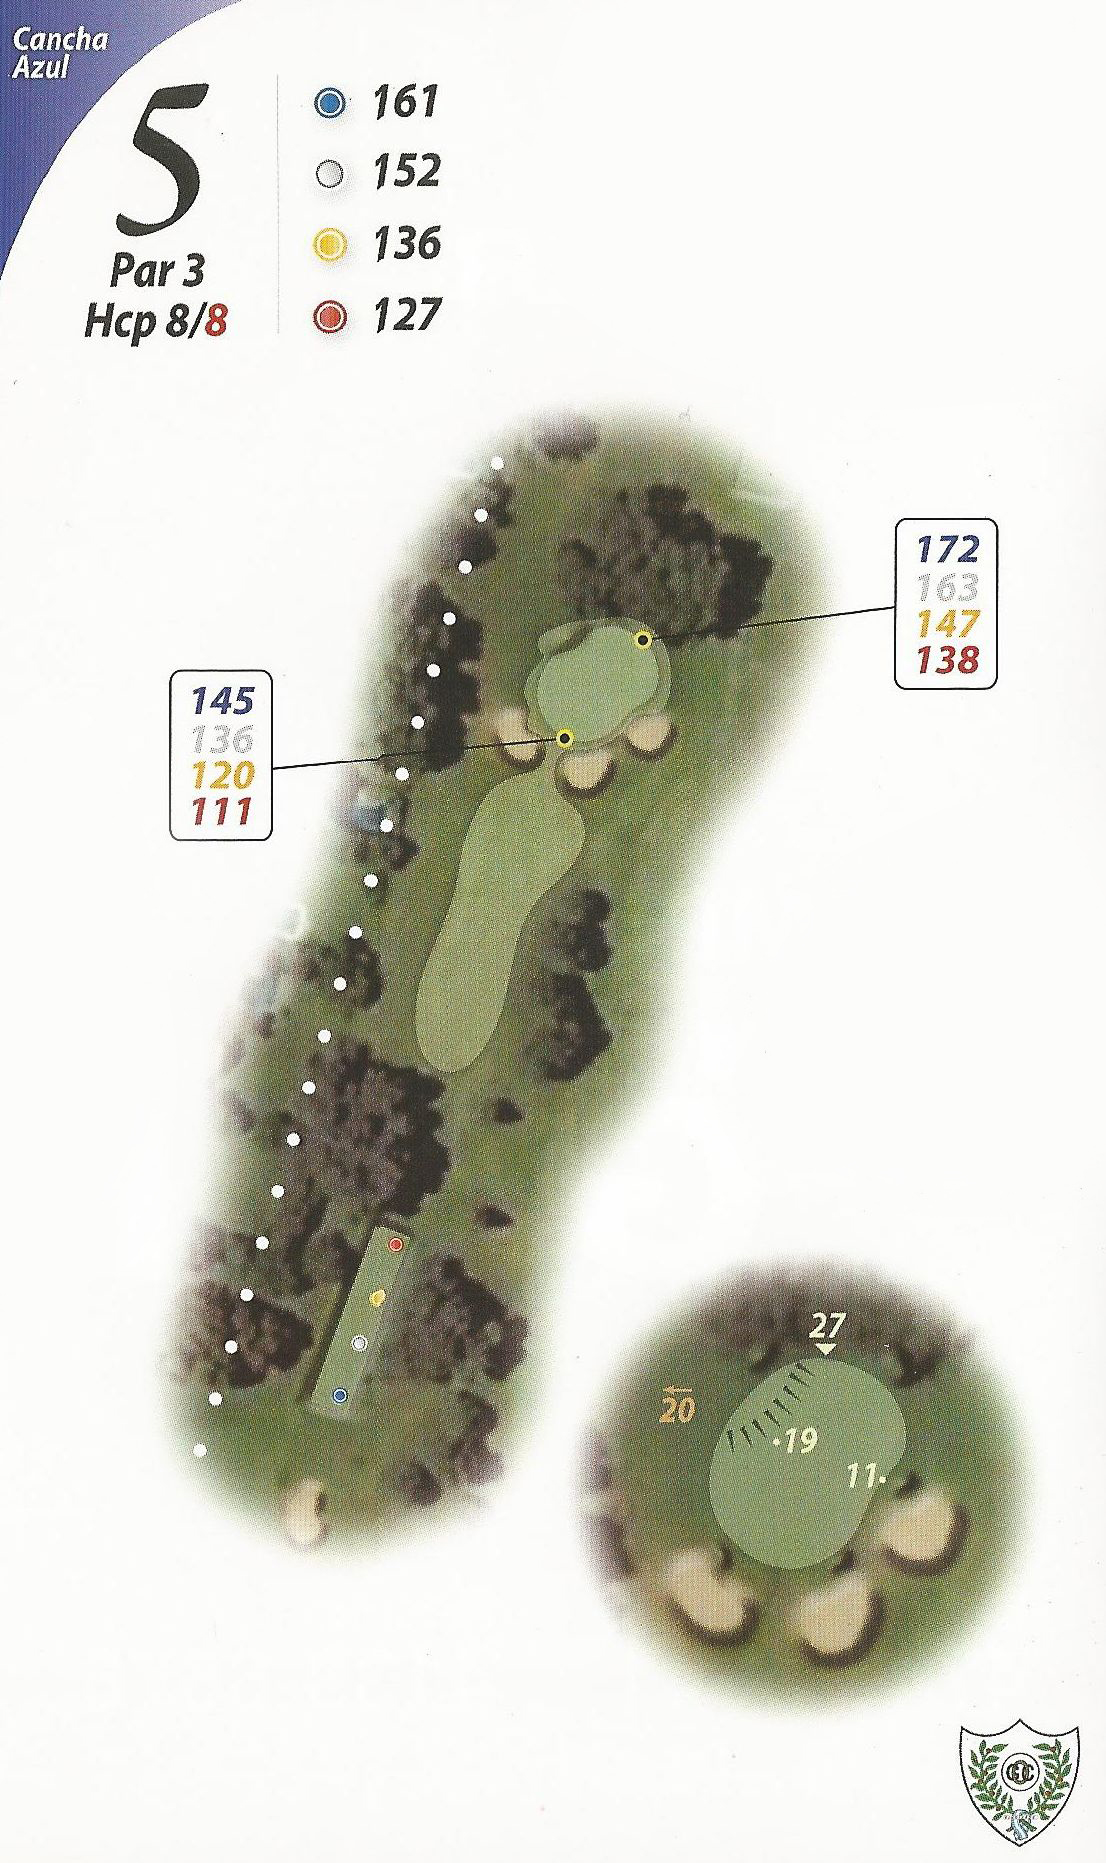
Hole 5 (Blue)
Par: 3 | Yards: 161
Although it is not a bad hole, it is nothing too special at all. It will be a 9 Iron for the average golfer. The green is small and usually difficult to understand the breaks, but even the lower skilled golfers will have a big chance of making a birdie here.
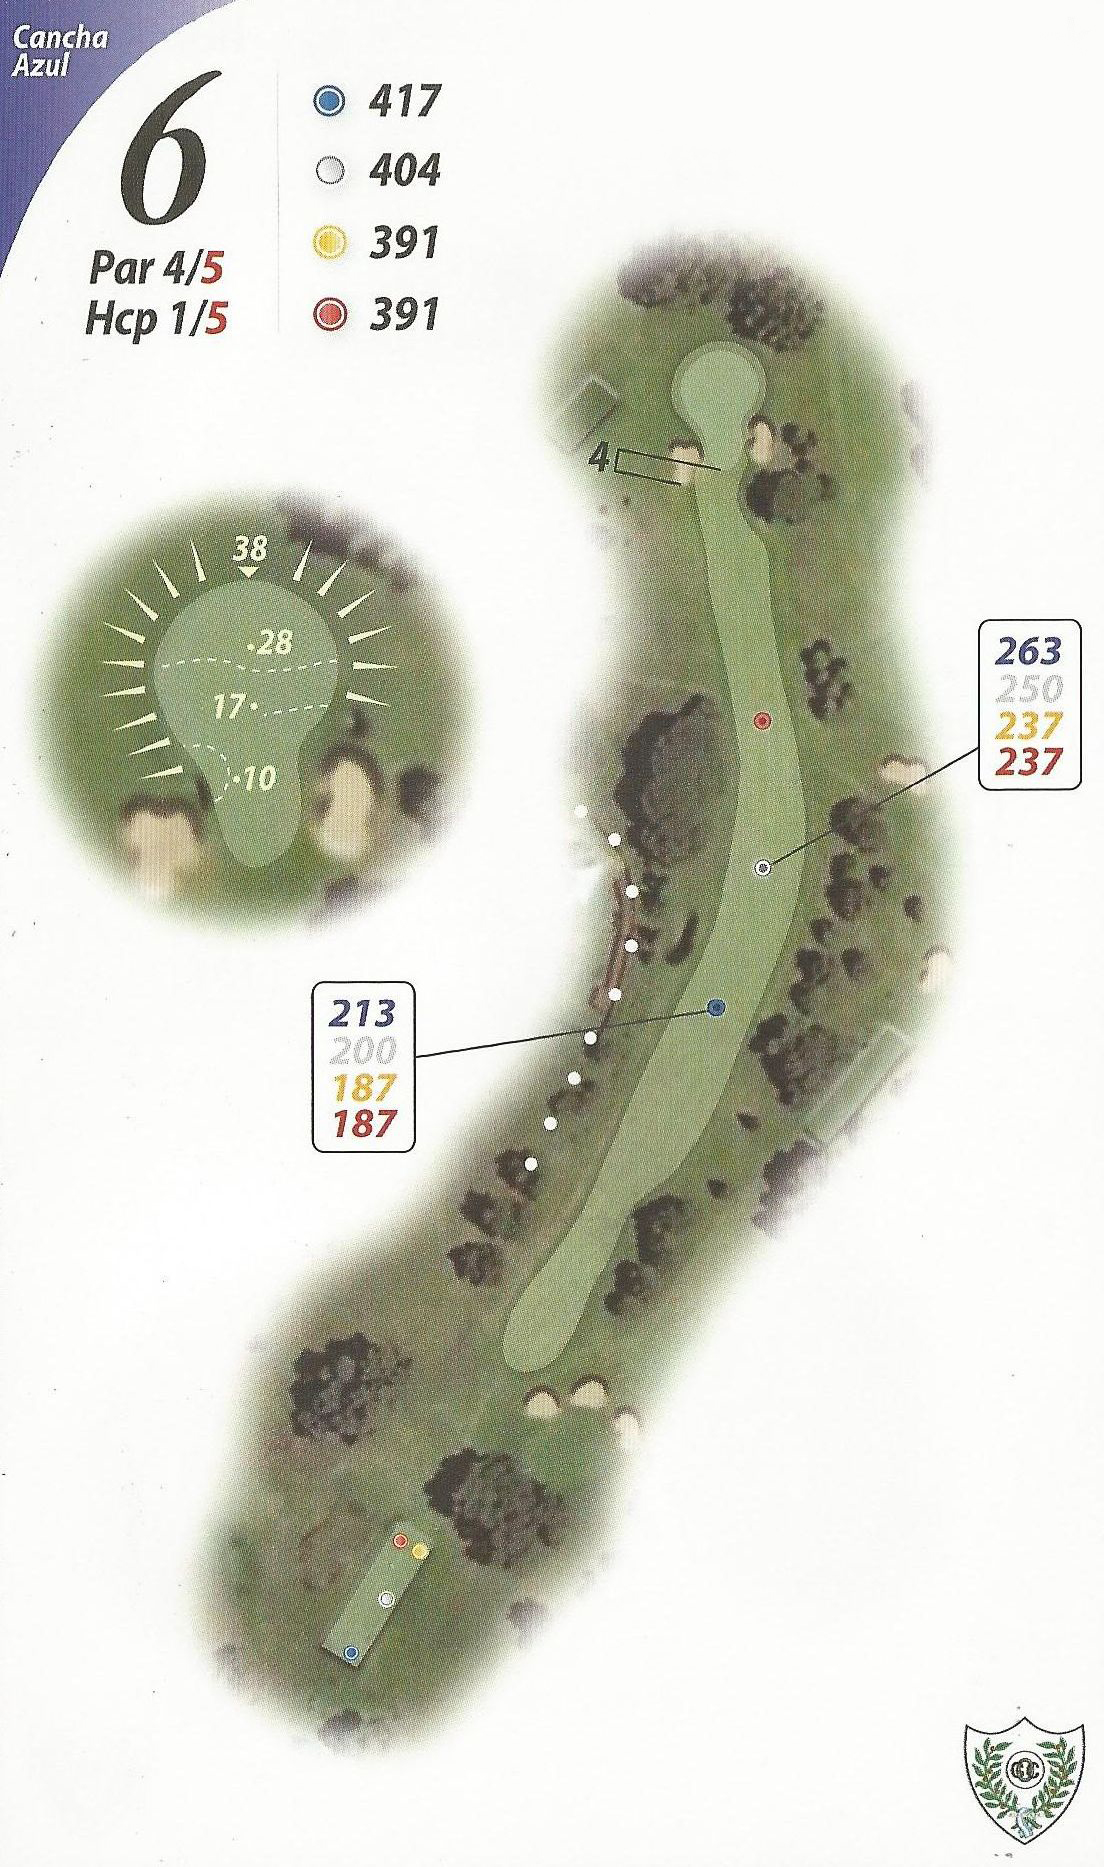
Hole 6 (Blue)
Par: 4 | Yards: 417
This hole is a dogleg left and maybe the best one of these 9 holes. There are houses close to the fairway, which hinder the game a bit. Nonetheless, it’s a very good hole. Tee shot needs to be accurate but no long, then the approach shot to an elevated green will offer some challenge even to the most skilled golfers.
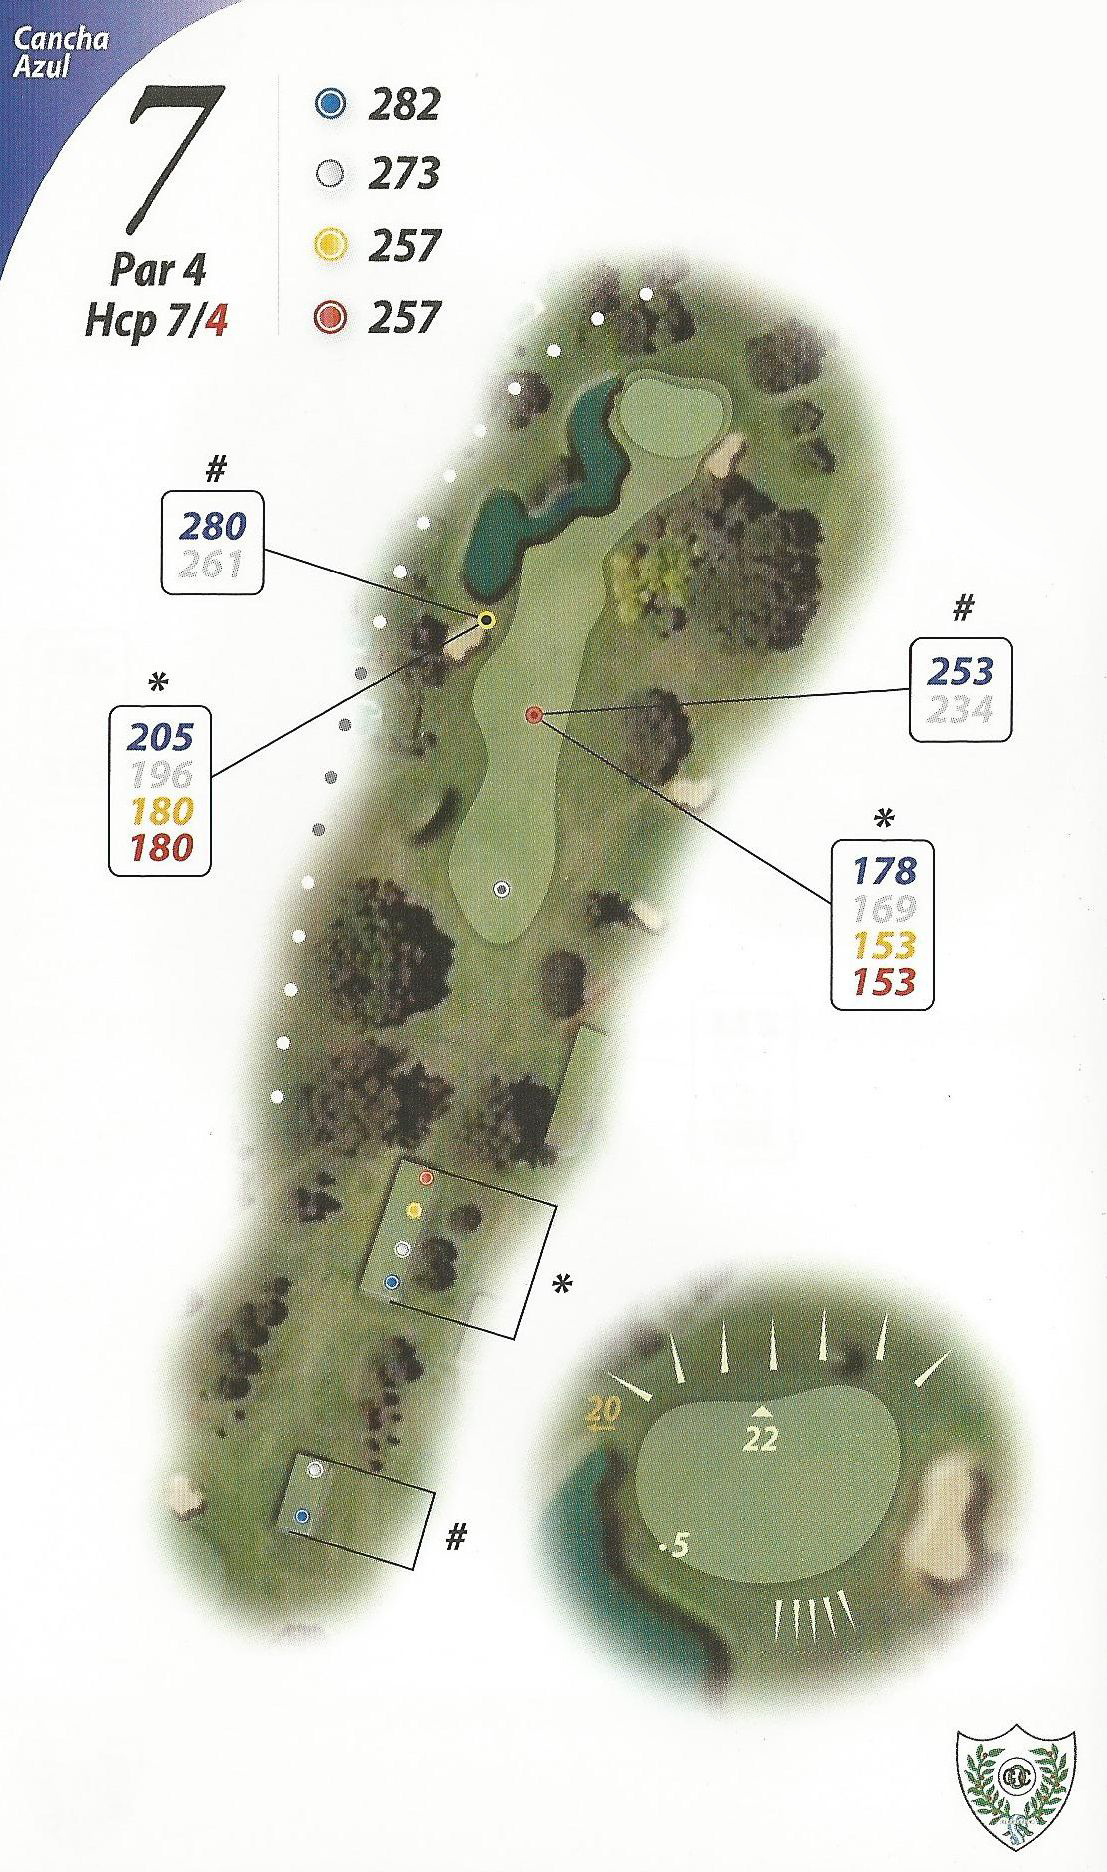
Hole 7 (Blue)
Par: 4 | Yards: 282
A very short par 4 that has suffered more than one redesign in the last years due to the proximity of the houses on the left side of the fairway. An almost blind tee shot which hides a small pond that will catch all shots longer than 230 yards. Approach shot to an elevated green will give some extra work to high handicappers, as if missed the recovery is not easy at all.
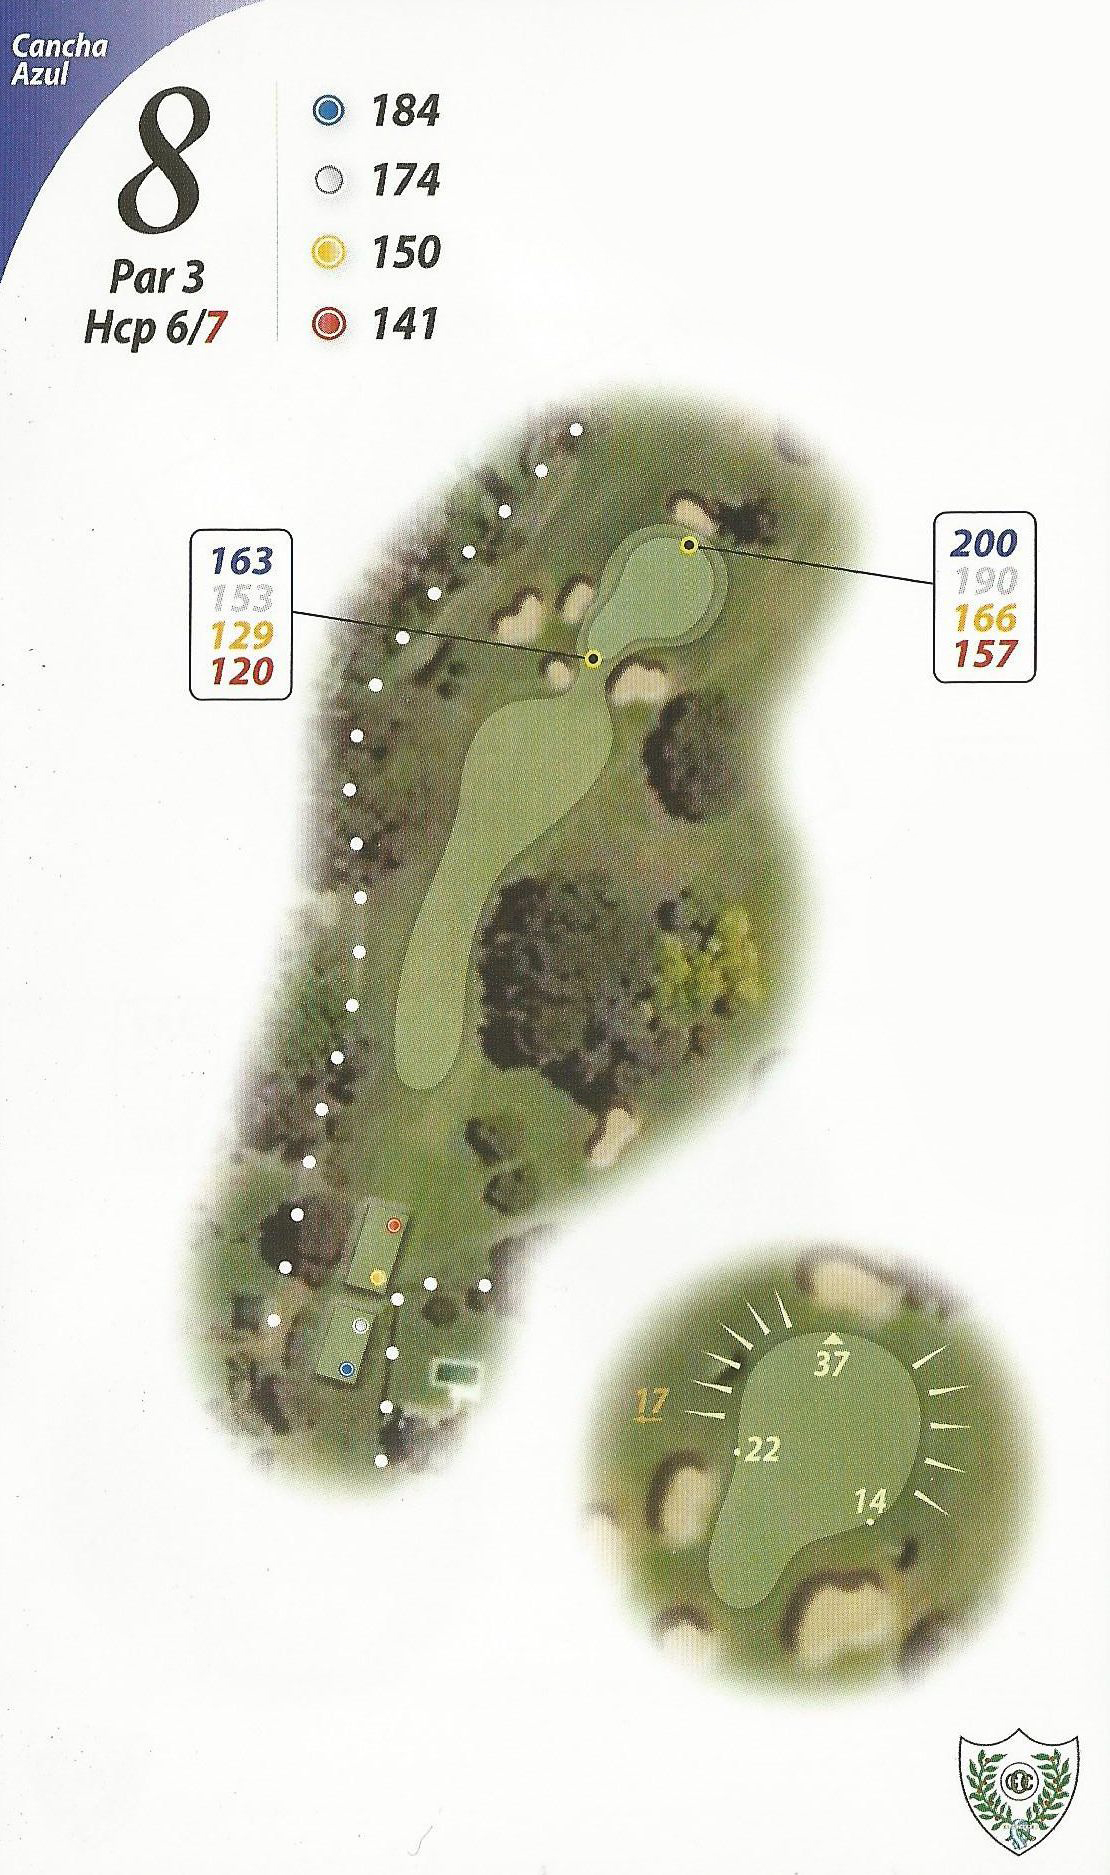
Hole 8 (Blue)
Par: 3 | Yards: 184
A Challenging hole and one of the best par 3s of the country. It’s difficult to calculate distance to the center of the green. The green is long and elevated on the end. Out of bounds on the left can be reached if there is wind. Some trees on the right make it tough to start the shot and then draw it, the only way is a high straight mid iron.
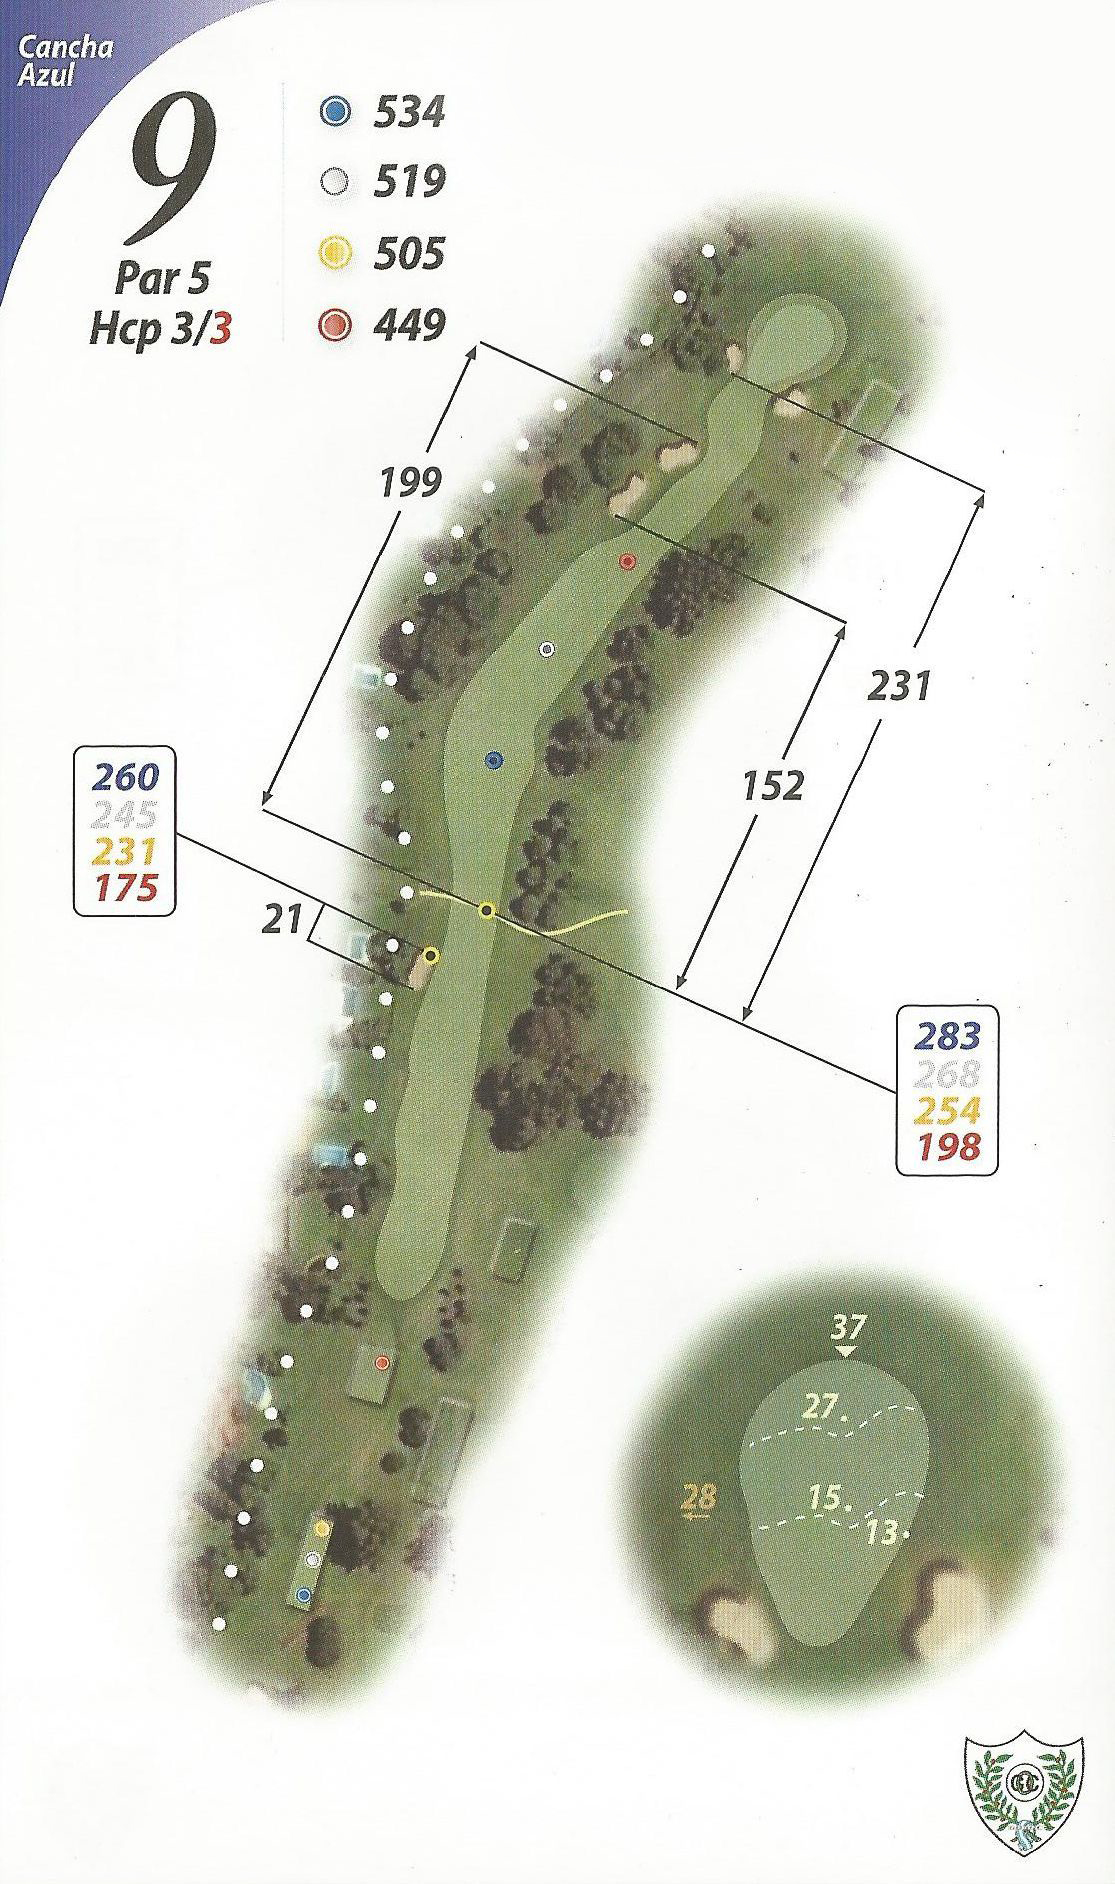
Hole 9 (Blue)
Par: 5 | Yards: 534
This hole is a dogleg right, being the turning point around 320 yards from the tee. For the second shot the trees on the right will make it tough for those trying to hit the green. It can be done but is maybe the toughest par 5 for this task. The best call is a lay up to the left for an easy approach shot. This is another nice hole that could easily be placed in the Championship Course, although it is used as the parking lot for the Argentine Masters Tournament.